Unveiling the Advantages and Disadvantages of Carbon Arc Welding
Imagine a welding technique that offers both remarkable benefits and notable drawbacks, making it a unique choice for various projects.…
Imagine finding your cherished brass heirloom cracked or broken. The thought of discarding it might feel unbearable, but what if you could restore it to its former glory? Fixing broken brass may sound daunting, especially for beginners, but with the right guidance, it’s entirely achievable. This complete guide will walk you through the entire process, from gathering essential tools like a soldering iron and flux, to mastering basic soldering techniques. You’ll learn the step-by-step procedures for preparing the brass, applying flux, heating, soldering, and finishing the repair.
Soldering is a method used to join two or more metal pieces together by melting and flowing a filler metal, known as solder, into the joint. The solder has a lower melting point than the workpieces, allowing it to flow and bond with the metals being joined without melting them. This technique is widely used in electronics, plumbing, and metalwork due to its effectiveness in creating strong, durable joints.
Lead-based solder, usually made of 60% tin and 40% lead, is easy to use and flows well. It melts at a relatively low temperature, making it suitable for delicate tasks. However, due to health and environmental concerns, its use has declined in favor of lead-free alternatives.
Lead-free solder is becoming more common, especially in consumer electronics and plumbing. It often contains a combination of tin, silver, and copper (SAC) and has a slightly higher melting point than lead-based solder. This type of solder is preferred for its safety and compliance with regulations like the Restriction of Hazardous Substances (RoHS) directive.
Silver-bearing solder contains some silver, making the joint stronger and better at conducting electricity. It is often used in high-stress applications and for joining dissimilar metals. The addition of silver also improves the wetting properties of the solder, making it easier to work with.
Ensure your work area is clean, well-lit, and ventilated. A heat-resistant surface, such as a soldering pad or fire bricks, is essential to protect your workspace. Gather all necessary tools, including a soldering iron or torch, solder, flux, and cleaning materials.
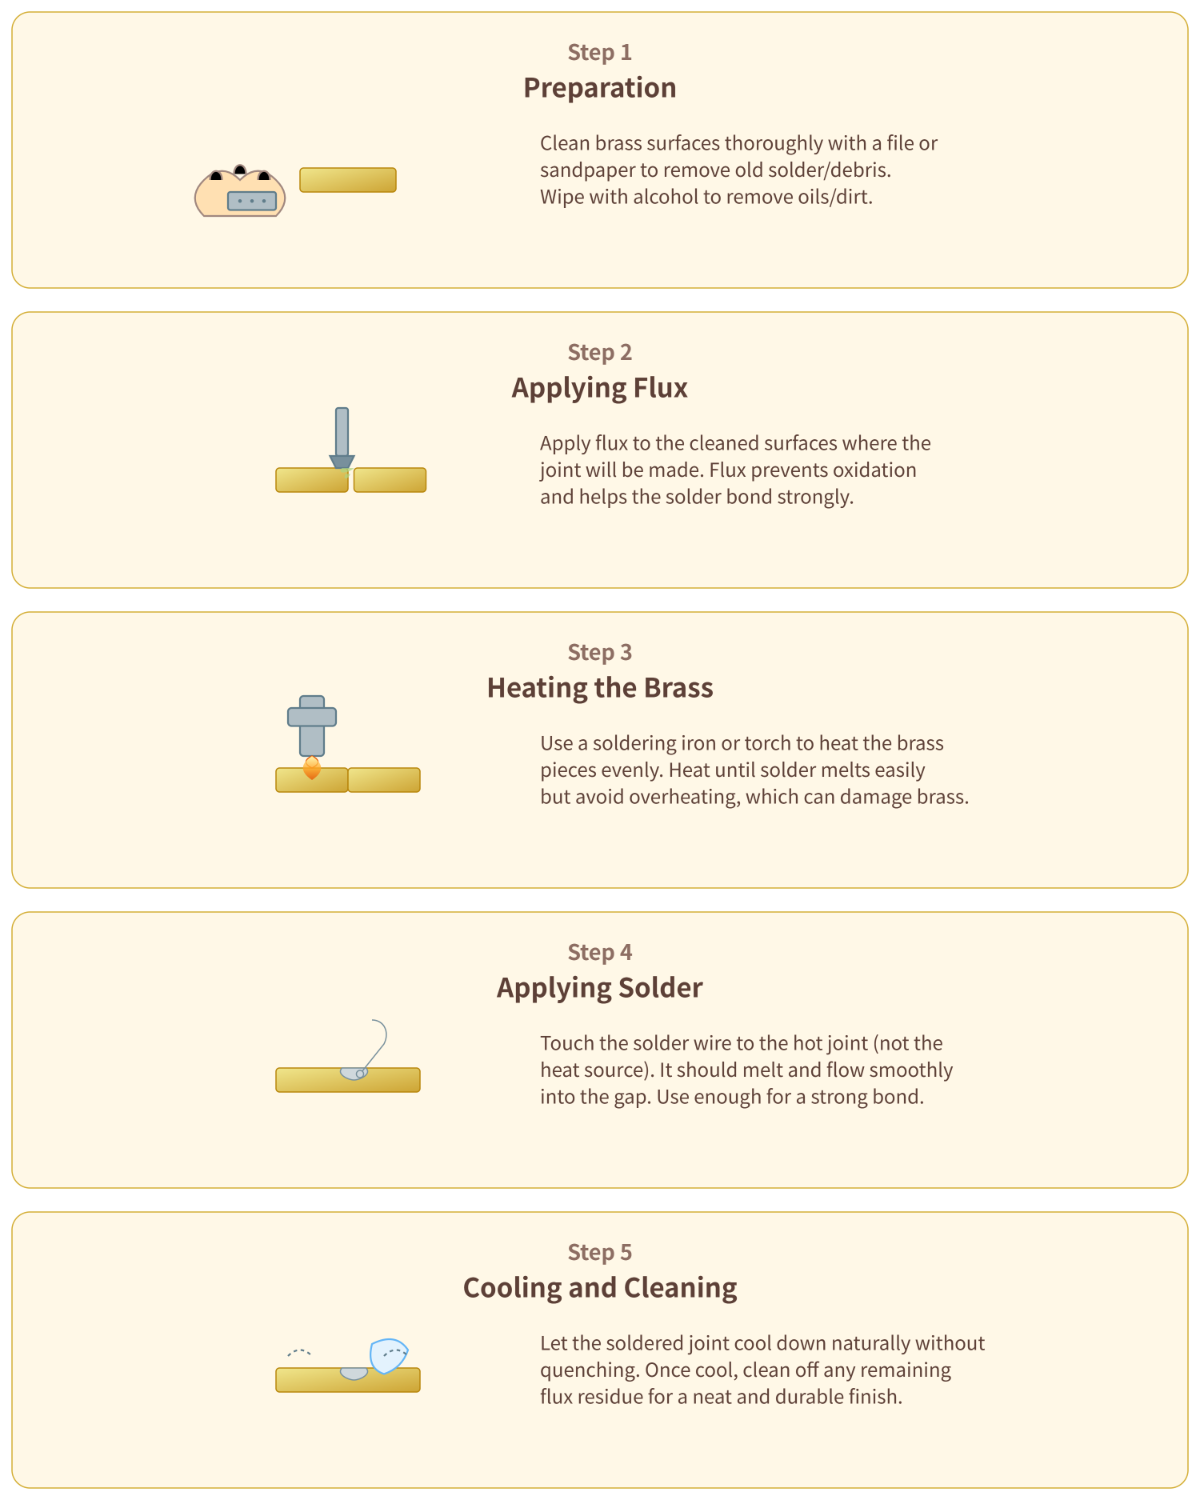
Cleaning the metal surfaces is crucial for a successful joint. Use steel wool, sandpaper, or emery cloth to remove oxidation, dirt, or coatings from the brass. This step ensures the solder will adhere properly to the metal.
Flux is a chemical agent that prevents oxidation during the soldering process and helps the solder flow smoothly. Use a brush or applicator to apply a thin layer of flux to the joint. Make sure to use flux specifically designed for the type of solder and metals you are working with.
Heat the joint evenly using a soldering iron or blow torch. The goal is to bring the entire joint to the solder’s melting point. The flux will bubble and smoke, indicating the joint is ready for soldering. Avoid overheating, as this can damage the metal or cause the solder to fail.
Once the joint is heated, touch the solder wire to the joint. The solder should melt and flow into the joint through capillary action. Ensure the solder fills the joint completely and forms a smooth, even bond. Avoid using too much solder, which can create weak joints and excess cleanup.
Let the soldered joint cool naturally without touching it. Once cooled, inspect the joint to ensure it is smooth and fully filled with solder. Clean any excess flux from the joint using isopropyl alcohol and a brush. This step prevents corrosion and ensures the longevity of the joint.
Ensure your workspace is well-ventilated and free of flammable materials. Use a small fan to help clear any fumes produced during soldering.
Thoroughly clean the brass surfaces using steel wool or emery cloth to remove any oxidation, lacquer, or contaminants. After this, wipe the cleaned brass surfaces with an alcohol swab to remove oils and fine particles, ensuring the surface is completely clean.
Align the brass pieces to ensure a snug fit. Use a metal file or sandpaper to make any necessary adjustments. Secure the pieces with clamps, a vice, or a third-hand tool to prevent movement during soldering.
Use a clean brush to apply a thin, even layer of flux to the joint area. Ensure the flux covers the entire joint to facilitate smooth solder flow and prevent oxidation.
Place the solder wire near the joint, ready to melt and flow into the joint when heated. Use a fine gauge solder for small pieces and a thicker gauge for larger pieces.
For larger brass pieces, use a blow torch. For smaller, more delicate joints, a soldering iron is suitable. MAPP gas is ideal for tasks requiring higher heat.
Move the flame in a circular motion to heat the brass evenly. Focus the heat on the denser brass until the flux starts to smoke or bubble, indicating the correct temperature for soldering.
Allow the soldered joint to cool naturally without using rapid cooling methods. This ensures the joint sets properly.
Once cooled, remove any excess solder and flux residues with a brass sponge or cleaning solution for a tidy finish.
Inspect the joint to ensure it is smooth, shiny, and uniform without gaps or excessive solder.
If necessary, conduct tensile or shear tests to measure the joint’s strength.
Check for electrical continuity with a multimeter to ensure low resistance, indicating a reliable connection.
Understanding why brass breaks is the first step in preventing it. Here are some common causes:
Brass is an alloy made primarily of copper and zinc. The ratio of these metals can affect its strength and susceptibility to breaking. High zinc content can increase the likelihood of stress corrosion cracking.
Brass can weaken over time when exposed to harsh environments or corrosive substances, such as certain chemicals or moisture. Corrosion and oxidation, combined with hard water that contains high levels of minerals, can compromise the integrity of brass components, especially in plumbing applications.
Improper installation practices can subject brass to excessive stress. This can happen if the brass components are forced into place or if they are not properly supported.
Rapid changes in temperature can induce thermal stress in brass, leading to cracks or breaks. Brass can expand and contract with temperature changes, and if these are too abrupt, the material may fail.
Exposing brass to incompatible chemicals can weaken it. Ensure that brass is suitable for the chemical environment it will be used in.
Continuous use and exposure to environmental factors can contribute to the wear and tear of brass items. Over time, this can lead to material fatigue and breakage.
Implementing preventive measures can significantly extend the lifespan of brass items and maintain their integrity.
Ensure that brass components are installed correctly. Avoid forcing parts into place, and use appropriate supports to minimize stress. Follow manufacturer guidelines for installation procedures.
Inspect brass items regularly for wear and tear. Perform maintenance as needed to address any issues early. This can include cleaning, tightening loose parts, and applying protective coatings.
Store brass items in dry, cool places away from direct sunlight and moisture. Avoid exposing brass to extreme temperature fluctuations or corrosive environments.
Use protective coatings or barriers to shield brass from corrosive substances. This can include applying a layer of varnish or using corrosion inhibitors designed for brass.
Choose brass alloys appropriate for specific applications. Different brass alloys have varying properties and resistance to stress, corrosion, and wear. Select the alloy that best suits the intended use.
If brass breaks, you can take steps to repair it:
Evaluate the extent of the break to determine if repair is feasible. Minor cracks or breaks can often be repaired, while more severe damage may require replacement.
Clean the area around the break thoroughly to ensure a smooth repair process. Remove any dirt, grease, or oxidation using appropriate cleaning materials.
Use soldering or brazing techniques to repair cracks in brass. These methods involve melting a filler metal into the joint to bond the broken pieces together. For complex breaks, it may be best to consult a professional.
After repairing the brass, apply protective coatings to enhance durability and resistance to future damage. This can include clear lacquer or specialized brass protectants.
While tarnish doesn’t directly cause breakage, preventing it helps maintain the aesthetic appeal and structural integrity of metal objects.
Store brass in dry conditions, using anti-tarnish bags or strips to minimize exposure to moisture and air.
Handle brass with gloves to avoid transferring oils from your skin, which can accelerate tarnishing.
Apply natural oils, such as olive oil, or clear protective coatings like Everbrite or ProtectaClear to shield brass from oxidation.
Safety is crucial when soldering brass to prevent injuries and ensure success. Here are some essential safety measures to follow:
A well-prepared workspace is key to safe soldering:
Ensure your workspace is well-ventilated with a fume extractor or small fan to disperse harmful fumes.
Use a heat-resistant surface like a soldering pad or fire bricks to prevent heat damage in your workspace.
Remove all flammable materials from your work area to reduce the risk of fire.
Proper handling of soldering tools is essential for safety:
After completing your soldering tasks, follow these steps:
Clean your hands thoroughly to avoid exposure to any potential toxins, even when using lead-free solder.
Check the soldered joint for strength and smoothness by applying gentle pressure.
Ensure brass surfaces are clean and free of oxidation. Use the correct type of flux and solder for brass, and heat the joint evenly to achieve a strong bond.
Secure the brass pieces firmly and avoid moving them during the cooling process. If necessary, reheat the joint and allow it to cool undisturbed for a solid connection.
Below are answers to some frequently asked questions:
To fix broken brass, follow these steps:
By carefully following these steps, you can effectively repair broken brass items. Remember to handle the materials safely and maintain proper ventilation while soldering.
To fix brass, you will need several essential tools and materials to ensure a strong and durable repair. Here is a list of what you will need:
By using these tools and materials, you can effectively repair broken brass items, ensuring they are both functional and aesthetically pleasing.
To prepare brass for soldering, start by cleaning the surfaces. Use lacquer thinner or acetone to remove protective coatings, then sand with 120 – 200 grit sandpaper to smooth edges and remove burrs. Finish by wiping with isopropyl alcohol to remove oils and fine particles. Next, assemble the pieces, ensuring a perfect fit and securing them with clamps or tape on a heat – resistant surface. Apply a thin, even layer of flux compatible with brass using a clean brush, being careful not to use too much.
Yes, you can fix brass without a soldering iron using alternative methods. One effective method is soldering with a propane torch, which involves using Super Alloy 1 solder and flux. Clean the brass with sandpaper, apply flux, heat the brass gently with the torch until the flux changes color, then apply the solder rod to create the bond. Another option is no-heat soldering with Copper Lock, which involves applying the solder inside the fitting, assembling the parts, and allowing them to bond. Additionally, mechanical fittings like compression or push-connection fittings can be used to join brass parts securely without heating. These methods provide flexibility depending on the repair needs and available tools.
To choose the right solder for brass, consider the following:
When selecting solder, prioritize strength, melting point, and cost. Ensure brass surfaces are clean and use appropriate flux to prevent oxidation during the process.
When soldering brass, safety is crucial. First, prepare your work environment by ensuring good ventilation to avoid inhaling harmful fumes, and clear flammable materials from the area. Use a heat-resistant surface and ensure your soldering iron is earthed to prevent electrical shocks. Wear safety glasses, protective gloves, and closed-toe shoes. Monitor the soldering iron’s temperature to prevent overheating, and clean the tip regularly. Always place the iron on its holder when not in use. Be careful with open flames, keep unauthorized people away, wash your hands after soldering, and handle chemicals properly.