Flange Bolt vs Hex Bolt: What’s the Difference?
When it comes to securing structures and machinery, bolts are the unsung heroes holding everything together. But not all bolts…
Imagine the stakes of a high-pressure system, where a single misstep in bolt tightening can lead to catastrophic leaks. Flange bolt tightening is not just a routine task; it’s an intricate dance of precision and technique that ensures the integrity of your system. This comprehensive guide is designed for those with an intermediate understanding, aiming to master the nuanced art of flange bolt tightening through a step-by-step approach. We’ll explore the critical crisscross sequence that prevents leaks and ensures even gasket compression, along with how to achieve the right torque distribution across multiple passes. Dive into tools, techniques, and best practices that will transform your approach to flange assembly. Ready to unlock the secrets of flawless flange bolt tightening? Let’s get started!
A torque sequence is a specific order in which bolts are tightened to ensure even distribution of load across a flange. This process is crucial for preventing deformation, gasket damage, and leaks, especially in high-pressure or high-temperature applications. By following a torque sequence, the mechanical stresses are balanced, enhancing the integrity and longevity of the assembly.
Before beginning the torque sequence, ensure all components are clean and free of debris. Lubricate the bolt threads, nuts, and washers to reduce friction and achieve consistent torque values. Hand-tighten the bolts to seat the components properly.
Visual aids can be immensely helpful in understanding torque sequences. Diagrams typically illustrate the numerical order in which bolts should be tightened. A common pattern used is the crisscross or star pattern, which helps in distributing the load evenly across the flange.
In this example, tighten the bolts in the following sequence: 1, 2, 3, 4, 5, 6, 7, 8. This pattern helps maintain the flange’s concentricity and prevents uneven gasket compression. By adhering to a well-defined torque sequence, the risks of flange deformation, gasket damage, and leaks are significantly minimized, ensuring a reliable and durable assembly.
A torque wrench is an indispensable tool for ensuring precise bolt tightening. It allows technicians to apply a specific torque value, preventing over-tightening and under-tightening, which could compromise the integrity of the flange connection. Torque wrenches are available in different styles, such as click, beam, and digital, each designed for specific uses and user preferences.
Torque multipliers and bolt tensioners are essential for enhancing bolt tightening precision and efficiency. Torque multipliers increase the torque output of a wrench, making it easier to achieve higher torque values without exerting excessive force. They can be manual or powered by pneumatic, hydraulic, or electric systems, providing versatility in different working environments.
Bolt tensioners apply a precise amount of tension to bolts, ensuring that flanges are securely sealed without over-tightening. These tools are especially useful in applications requiring high accuracy and consistency. Available in various ranges to suit different bolt sizes, bolt tensioners help maintain the integrity of the flange assembly.
Hydraulic flange tightening tools offer a compact footprint and high versatility. Suitable for use on various types of flanges, including ANSI, API, and DIN standards, these tools feature an easy-to-use locking system that reduces operator fatigue and minimizes pinch points. Hydraulic systems provide fast and controlled tightening, enhancing efficiency and safety.
Bolts used in flange connections must be of high quality and strength to withstand operational pressures and ensure a secure seal. Choosing high-quality materials like bolts and gaskets is crucial to ensure the safety and longevity of flange connections.
Gaskets and seals are critical components that prevent leaks and maintain system integrity. They must be suitable for the specific flange type and application, ensuring a reliable and durable connection.
Lubricants are applied to the threads of bolts to reduce friction during tightening and prevent galling. Proper lubrication is essential for achieving accurate torque values and extending the lifespan of bolts.
Supporting equipment such as hand pumps, hydraulic hoses, and portable toolkits are often included with hydraulic flange tightening tools. These accessories facilitate efficient operation and ensure that the tools perform optimally.
Bolts should be tightened in a star pattern to ensure even distribution of force across the flange. This method helps prevent uneven gasket compression and flange deformation.
Always consult the manufacturer’s guidelines for recommended torque values. Adhering to these specifications prevents over-tightening and ensures the reliability of the assembly.
Regular inspections and timely replacement of worn bolts and gaskets are essential for maintaining the system’s reliability. Routine maintenance helps prevent leaks and ensures the long-term performance of the flange connection.
The crisscross pattern, or star pattern, is a method used to tighten bolts on a flange evenly, ensuring balanced load distribution. This technique involves alternating the tightening of opposing bolts, which helps maintain parallelism of the flange faces and minimizes the risk of misalignment and uneven gasket compression. Applying torque in a crisscross manner distributes stress evenly, reducing the risk of gasket failure or leaks.
Before starting the crisscross tightening sequence, ensure that all bolts, nuts, and washers are clean and free of debris. Hand-tighten the bolts to seat the flange components properly, and apply an appropriate anti-seize lubricant to the bolt threads to reduce friction and achieve consistent torque values.
Post-Torque Inspection
To help visualize the crisscross pattern, consider a diagram for a typical 8-bolt flange:
In this example, the tightening sequence would be 1, 5, 3, 7, 4, 8, 2, 6. This pattern ensures that the bolts are tightened in a manner that evenly distributes the load across the flange.
By adhering to the crisscross pattern and following a systematic tightening sequence, the integrity and reliability of flange assemblies can be significantly enhanced, reducing the risk of leaks and ensuring long-term performance.
Bolt preload is the tension applied to a bolt when it is tightened, ensuring the bolt acts like a spring to maintain the necessary clamping force. This preload is critical for the integrity of bolted joints, particularly in flanged connections where it helps prevent leaks and maintain stability under operational conditions.
Proper torque application ensures that the bolt reaches the desired tension, while factors such as bolt diameter, length, and thread geometry also play significant roles. The friction between the bolt head, nut, and threads impacts how much of the applied torque is converted into tension, and lubrication can significantly reduce friction, improving preload accuracy.
Accurate bolt preload is essential for ensuring the reliability of the joint. Here are the steps to achieve it:
Torque wrenches are essential for applying precise torque values and come in various types, including click, beam, and digital wrenches. Each type offers different features for achieving accurate torque application.
Ensuring the correct bolt preload is crucial for compressing the gasket evenly and creating a reliable seal. Insufficient preload can lead to gasket relaxation and leaks, while excessive preload can crush the gasket, causing it to fail.
After the initial tightening, it’s important to monitor the preload over time, especially in high-pressure or high-temperature applications. Regular inspections and adjustments may be necessary to account for bolt relaxation and ensure the joint remains secure.
Lubrication is crucial for extending the lifespan of bolts, especially in flange tightening applications, because it reduces friction between threads. Lubrication is key to achieving precise torque values by reducing thread friction, ensuring uniform bolt load distribution, and enhancing reliability in bolted joints, crucial for meeting standards like ASME B16.5.
Choosing the appropriate lubricant is vital to ensure compatibility with the bolt material and the operating environment. High-temperature or chemical-resistant formulations may be necessary depending on the application conditions. It is important to avoid using incompatible lubricants, such as certain greases, which can accelerate corrosion or impair sealing effectiveness.
Apply lubricant evenly across all parts of the bolt, including threads, nuts, and washers, to reduce friction and prevent joint failure. This uniform application minimizes uneven friction and helps prevent joint failure. Regular relubrication during maintenance cycles can maintain the desired friction coefficients and ensure effective load distribution.
Lubrication not only complements the natural corrosion resistance of materials like stainless steel but also extends bolt life in tough environments. Pairing it with protective coatings can further boost durability, particularly in moisture-rich or chemically aggressive settings.
Routine checks are vital to inspect bolts for signs of loosening, corrosion, or lubricant degradation. High-vibration settings may necessitate more frequent inspections. Documentation of lubrication type, application frequency, and torque results can help refine maintenance schedules and anticipate replacement timelines.
Since lubrication reduces friction, it’s important to adjust torque wrenches accordingly to prevent over-tightening, which can damage bolts. Ensuring clean surfaces before lubrication prevents contamination that can lead to accelerated wear.
An integrated approach combining proper lubrication, material selection, and torque precision can maximize bolt lifespan. Training technicians on the importance of lubrication in torque accuracy and joint integrity is crucial to prevent installation errors. Employing condition monitoring tools, such as ultrasonic or torque auditing devices, can verify bolt load retention post-lubrication.
Manual tightening of flange bolts is a common method that uses torque wrenches to apply a specified torque to bolts, valued for its simplicity and cost-effectiveness.
Torque wrenches and torque multipliers are essential tools in manual tightening. Torque wrenches come in various types, including click, beam, and digital, offering features like preset torque limits or digital readouts for precise measurement. Torque multipliers amplify the torque applied by the wrench, making it easier to achieve higher torque values without excessive physical effort.
Hydraulic tightening methods, including hydraulic torque wrenches and hydraulic bolt tensioners, offer significant improvements in precision, efficiency, and load consistency over manual techniques.
Hydraulic bolt tensioners work by stretching the bolt with hydraulic pressure, tightening the nut, and releasing pressure to maintain the clamping force without torsional stress.
Manual tightening is variable and labor-intensive, with higher torsional stress risk, suitable for less demanding tasks. Hydraulic methods offer precision and efficiency, minimizing stress, ideal for critical, high-pressure joints.
Uneven gasket compression often leads to leaks and failures, usually due to improper bolt tightening techniques or sequences. To ensure balanced stress distribution, implement a criss-cross tightening pattern, which involves tightening bolts diametrically opposite each other. This method helps evenly compress the gasket. Additionally, use incremental torque steps, such as applying torque in stages (e.g., 1/3, 2/3, full torque), allowing the gasket to seat properly and distribute pressure evenly. Perform 360° circumferential passes after reaching the final torque to confirm that no nuts have moved, ensuring uniform load distribution and proper gasket compression.
Bolt relaxation and stress loss can compromise the integrity of the flange assembly over time. Bolts may lose tension due to material relaxation or thermal cycling. To mitigate this, allow pause intervals of 20 minutes to 4 hours after initial tightening for the system to stabilize. This period helps redistribute stresses and reduce bolt relaxation. Repeat circumferential passes until no movement is detected, maintaining bolt tension and ensuring a secure assembly. Apply lubricant to threads and washers to reduce friction-induced tension loss, achieving accurate torque values and maintaining bolt load over time.
Inadequate bolt load consistency often results from human error or tool inaccuracy, leading to under-torqued or over-torqued bolts. Use accurately adjusted torque wrenches and validate torque values based on the flange material and gasket type. Accurate tools are essential for consistent bolt loads. Follow a numbered bolt sequence to systematically distribute the load, reducing the risk of uneven bolt tension and ensuring uniform compression. Some guidelines recommend four tightening stages instead of three for improved uniformity, helping achieve more consistent bolt loads across the flange.
How do temperature fluctuations and vibrations impact bolt tension? Thermal and operational stress effects can alter bolt tension, risking joint integrity and potentially causing leaks. Schedule post-installation checks after the system has stabilized, with regular re-torquing to ensure bolts maintain their tension and the flange assembly remains secure. Use high-temperature gaskets compatible with operational conditions, maintaining their integrity under fluctuating temperatures and reducing the risk of leaks.
Flange misalignment during assembly can create uneven contact surfaces, compromising the seal and leading to leaks. Verify alignment using dial indicators or laser alignment tools before tightening. Ensuring proper alignment helps achieve even gasket compression and a secure seal. Hand-tighten all bolts initially to center the flange, aligning the flange faces and reducing the risk of misalignment during final tightening.
Inconsistent lubrication can increase friction, leading to inaccurate torque readings and compromised bolt tension. Apply lubricant uniformly to all load-bearing surfaces, reducing friction variability and ensuring accurate torque application. Inspect threads for damage or debris before installation; clean, undamaged threads help achieve consistent friction and accurate bolt loads.
Variations in technician practices can cause inconsistent results in flange bolt tightening, leading to potential leaks and gasket failure. Follow ANSI/ASME guidelines for bolt patterns and torque values, ensuring consistent and reliable flange assembly. Implement training programs that emphasize staged tightening and pattern adherence, reducing variability and improving assembly quality.
ASME and ANSI provide essential guidelines for assembling bolted flange joints, ensuring safety, reliability, and uniformity in industrial applications.
ASME PCC-1 is a comprehensive standard focused on bolted flange joint assembly. It outlines best practices, including bolt tightening sequences, to ensure even load distribution and prevent gasket damage. Appendix F of ASME PCC-1 and ANSI standards both emphasize the use of the star (or crisscross) pattern for bolt tightening to ensure even gasket compression and introduce alternative patterns for improved efficiency and accuracy.
Bolt torque tables provide recommended torque values for various bolt sizes and materials. These tables guide technicians to apply the right amount of torque, preventing bolts from being over-tightened or under-tightened.
Adhering to established standards and best practices is essential for ensuring the safety and reliability of flange connections in industrial settings.
Regular calibration of torque wrenches and other tightening tools is fundamental to maintaining accuracy. Calibrated tools ensure that the applied torque values are consistent with the specifications, preventing uneven load distribution that could compromise the flange assembly.
Implementing a staged tightening process, typically in three to four passes, helps achieve uniform gasket compression. The stages usually involve:
After the final tightening pass, recheck the torque on all bolts in a circular pattern to ensure consistency and compensate for any relaxation. This verification step helps maintain the joint’s integrity under operational conditions.
Recent guidelines emphasize the importance of four-pass tightening sequences for critical applications. This additional stage helps minimize bolt relaxation and ensures a more uniform load distribution across the flange.
The adoption of hydraulic torque wrenches has increased in high-precision industrial settings due to their ability to deliver consistent and accurate torque application, significantly reducing assembly time and improving safety.
Check the flange surfaces for radial scores, warping, or corrosion. The faces should be parallel and free from contaminants such as paint or dirt. Ensuring that the flange faces are clean and undamaged is critical for achieving a proper seal.
Examine the bolts, nuts, and washers for any rust, burrs, cracks, or thread damage. Ensure that the threads are fully engaged and in good condition. This step is essential to prevent any future loosening or failure of the fasteners.
Ensure the gasket material, size, and thickness are correct and suitable for the application. Replace any damaged gasket or one that doesn’t meet service requirements for a reliable seal.
Ensure that the threads, nut undersides, and washers are properly lubricated with an approved anti-seize compound, such as oil-graphite mixtures. Proper lubrication reduces friction and helps achieve consistent torque values.
Confirm that there is no lubricant residue on the gasket or flange sealing surfaces. Residue can compromise the seal and lead to leaks.
Use straightedges to check for warping beyond ASME B16.5 tolerances. The flange faces must remain parallel to ensure even gasket compression and a proper seal.
Check that the bolt holes are concentric and allow smooth insertion of bolts without forcing. Misaligned bolt holes can lead to uneven load distribution and potential leaks.
Cross-reference the bolt and nut material grades (e.g., ASTM A193/A194) and hardness with the design documentation. Using the correct materials is crucial for the integrity and safety of the assembly.
Ensure the gasket’s temperature and pressure ratings match the service conditions. This ensures that the gasket will perform reliably under operational stresses.
Conduct hydrostatic or pneumatic tests as per ASME PCC-1 guidelines. Check for any signs of weeping or pressure drops that indicate potential leaks.
Recheck the torque values after 24-48 hours of operation to identify any relaxation. This step helps ensure that the bolts maintain their load and the assembly remains secure.
Verify that the torque sequence followed the cross-pattern tightening and incremental torque stages. Proper documentation helps maintain consistency and reliability in future inspections.
Document any issues such as stripped threads, galling, or pitting on the flange faces that require remediation. Keeping a detailed log helps address defects promptly and prevent future problems.
Inadequate lubrication can cause significant variance in achieved bolt tension for identical torque inputs. Proper lubrication is essential to manage friction and ensure accurate bolt preload.
Radial scratches greater than 0.1mm depth on flange faces typically necessitate resurfacing or replacement. Prioritizing defect repairs ensures the integrity of the flange connection.
Schedule infrared thermography to detect abnormal heat patterns that may indicate seal failure. Regular monitoring helps maintain the reliability of the assembly under operational conditions.
Below are answers to some frequently asked questions:
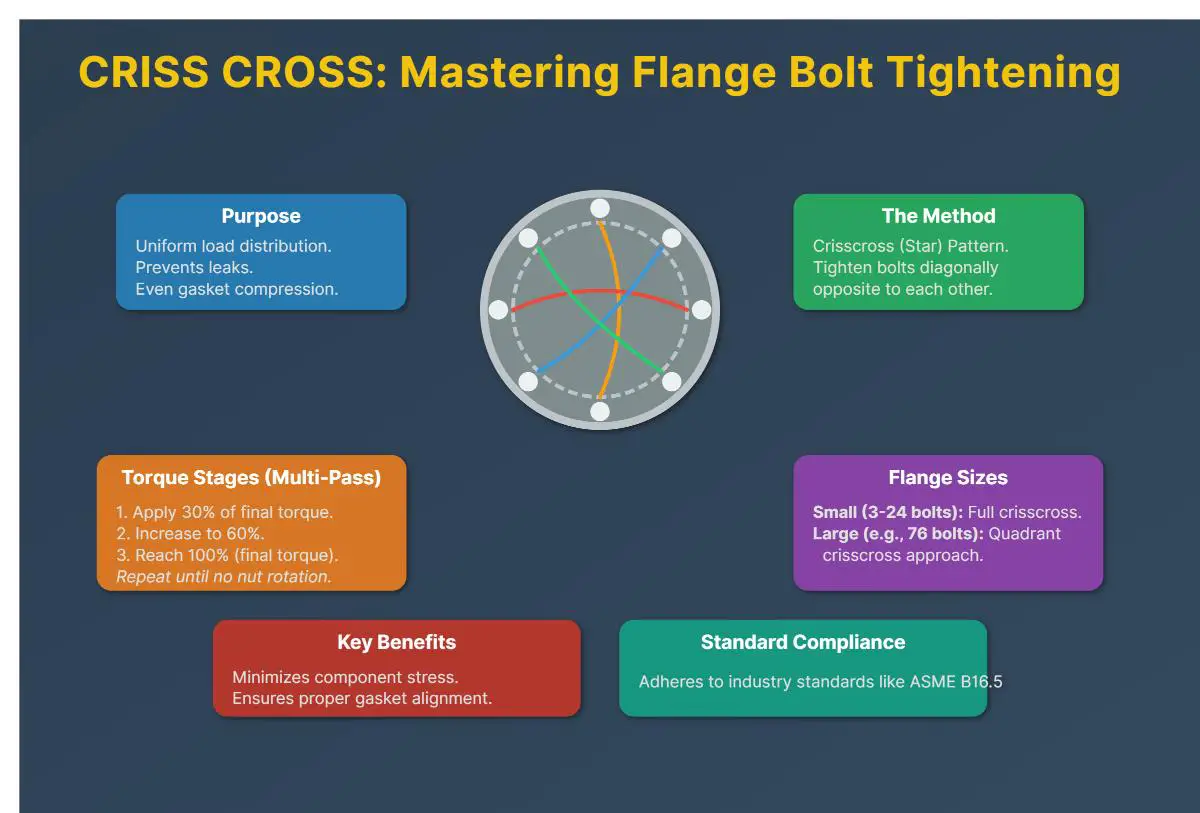
The correct crisscross sequence for flange bolt tightening is designed to ensure uniform load distribution and prevent leaks by evenly compressing the gasket. The crisscross pattern, also known as the star or cross-pattern, involves tightening bolts diagonally across the flange in multiple passes. This method begins by numbering the bolts clockwise around the flange and follows a systematic sequence to achieve even tensioning.
Typically, for flanges with bolts ranging from 3 to 24, a specialized numbered sequence is followed to ensure uniform compression. The process involves three main torque application passes: starting with 30% of the final torque, increasing to 60%, and finally reaching 100%, repeating until no further nut rotation occurs. For larger flanges, such as those with 76 bolts, a crisscross quadrant approach is used, tightening diagonally across divided sections. This pattern minimizes component stress and aligns the gasket properly, adhering to industry standards such as ASME B16.5.
To prevent flange leaks through proper torque techniques, it’s crucial to ensure uniform gasket compression and adequate sealing pressure. Begin by employing a star or criss-cross bolt tightening pattern to evenly distribute compressive forces across the gasket surface, minimizing uneven compression zones that can lead to leaks. Use a multi-pass, staged tightening approach, gradually increasing torque over three to four passes. This method allows the gasket to compress uniformly and reduces uneven load distribution.
Utilize a calibrated torque wrench to apply the correct torque values, which should be determined based on bolt size, gasket type, and lubrication. Regularly account for torque loss factors such as bolt relaxation and gasket creep, which may require re-torquing after initial assembly. Proper lubrication of bolt threads is also essential, as it reduces friction, enhances torque-to-tension conversion, and extends bolt life. By following these practices, you can effectively prevent flange leaks and ensure reliable, long-lasting seals.
In a typical flange bolt tightening process, torque is applied in multiple passes to ensure uniform gasket compression and to prevent flange warping. The recommended sequence involves three primary passes with incremental torque increases:
After completing these passes, a final verification pass at 100% torque is often recommended to ensure all bolts meet the target torque and to confirm that no further nut rotation occurs. This method helps maintain the integrity of the gasket and ensures a reliable, leak-free assembly.
When tightening flange bolts, it is crucial to allow sufficient time between passes to ensure proper stress distribution and gasket compression. Generally, waiting about 10 to 30 minutes between tightening passes is recommended for manual methods. This interval helps accommodate stress relaxation and ensures uniform bolt preload. During this period, check the bolts previously tightened to ensure they maintain the correct torque.
For hydraulic tightening methods, the time between passes can be significantly reduced, as these tools enable simultaneous tightening of multiple bolts, providing more consistent and quicker results. However, regardless of the method, the goal is to ensure the flange remains parallel and the gasket is evenly compressed, preventing leaks and ensuring the integrity of the assembly.
Hydraulic tightening methods offer several key benefits for flange bolt tightening. Firstly, they provide precision and accuracy by directly measuring axial force, ensuring bolts are tightened to specified preloads without the guesswork associated with torque-based methods. This uniform load distribution is crucial for preventing leaks or failures in high-pressure flanges. Secondly, hydraulic systems enhance operational efficiency by significantly reducing downtime; they can fasten an entire flange in a single operation and ensure consistent results across multiple installations, minimizing rework. Additionally, they improve safety by reducing physical strain on operators and controlling force application to prevent sudden bolt failures or component damage. Hydraulic systems also offer compatibility with various industry standards and enhance the durability of components by applying pure axial force, which reduces wear on bolts and threads. Finally, they are cost-effective by preventing flange leaks, joint failures, and maintenance delays, thus lowering long-term operational costs.
Lubrication is crucial for bolt longevity, particularly in flange bolt tightening, due to several factors. Firstly, lubrication reduces friction between the bolt threads and the nut, which facilitates smoother tightening and loosening processes, minimizing wear and extending the life of the bolts. This reduction in friction also helps achieve the correct torque without over-tightening, preventing bolt stretching and maintaining structural integrity.
Additionally, lubrication acts as a protective barrier against corrosion, which is essential for bolts exposed to harsh environments. It also prevents galling, a type of surface damage that occurs when metals slide against each other, which can compromise bolt effectiveness over time.
Using the appropriate lubricant, considering environmental conditions and the materials involved, ensures that bolts remain durable and perform optimally. Therefore, lubrication not only enhances the immediate efficiency of bolt tightening but also contributes to the long-term reliability and maintenance of the assembly.