I. Factors affecting surface roughness after cutting
1. Geometric factors
Geometric factors mainly refer to the shape and geometric angles of the tool, especially the tool tip radius r ε , main cutting edge angle K r , and secondary cutting edge angle K’ r , as well as the feed rate f, and the surface roughness of the cutting edge itself.
Under ideal cutting conditions, the maximum height R max of the theoretical surface roughness caused by geometric factors can be calculated from geometric relationships.
As shown in Figure 1, assuming r ε =0, we can obtain R max =f/(cotK r +cosK’ r ).

a) Turning with rounded edge
b) Turning with sharp edge
In reality, the tool tip always has a certain radius, i.e., rε ≠0. In this case, Rmax ≈f2 /(8rε ) can be obtained.
2. Physical factors
Due to the existence of physical factors related to the properties of the machined material and cutting mechanism, the actual surface roughness after cutting often differs significantly from the theoretical surface roughness.
For plastic materials, at a certain cutting speed, a built-up edge with high hardness forms on the tool face, replacing the cutting edge in the cutting process, thus changing the tool’s geometric angles and cutting thickness.
The friction and cold welding of chips on the rake face may cause the chips to stay periodically, replacing the tool in pushing and squeezing the cutting layer, causing tearing between the cutting layer and the workpiece, forming scales. Moreover, the periods of built-up edge and chip retention are not stable, which will greatly increase the surface roughness value.
During the cutting process, the tool’s edge radius and the compression and friction of the flank face will cause plastic deformation of the metal material, distorting the theoretical residual cross-section and increasing the surface roughness value.
3. Technological factors
(1) Geometric shape, material, and grinding quality of the tool
The impact of these parameters on surface roughness can be analyzed through their effects on the theoretical residual area, friction, compression and plastic deformation, and the possibility of vibration. For example, increasing the rake angle γ helps reduce cutting forces, reducing plastic deformation and thus surface roughness; however, if γ is too large, the cutting edge tends to cut into the workpiece, more easily producing vibrations, thus increasing surface roughness.
Also, increasing the tool tip radius rε can reduce surface roughness from a geometric perspective, but it will also increase compression and plastic deformation during cutting. Therefore, increasing rε is beneficial for reducing surface roughness only within a certain range.
For tool materials, the main considerations are their hot hardness, friction coefficient, and affinity with the machined material. High hot hardness means good wear resistance; a small friction coefficient facilitates chip removal; low affinity with the machined material reduces the likelihood of built-up edge and scale formation.
The tool’s grinding quality is primarily reflected in the cutting edge. A sharp edge provides good cutting performance; a small surface roughness value of the edge helps reduce the replication of tool surface roughness on the workpiece.
(2) Cutting parameters
The feed rate f directly affects the theoretical residual height and influences cutting forces and material plastic deformation. When f>0.15mm/r, reducing f can significantly decrease surface roughness; when f<0.15mm/r, the influence of plastic deformation becomes dominant, and further reduction of f has little effect on surface roughness.
Generally, the depth of cut ap has no significant effect on surface roughness. However, when ap and f are too small, cutting may not occur due to insufficient tool sharpness and system rigidity, resulting in compression that actually increases surface roughness.
A higher cutting speed v often prevents the formation of built-up edges and scales. For plastic materials, high-speed cutting with v exceeding the plastic deformation speed prevents full material deformation; for brittle materials, high-speed cutting generates higher temperatures, making the material less brittle, thus high-speed cutting is beneficial for reducing surface roughness.
(3) Workpiece material and lubrication cooling
The degree of material plasticity greatly affects surface roughness. Generally, the higher the plasticity, the easier it is for built-up edges and scales to form and grow, resulting in higher surface roughness. The surface roughness of machined brittle materials is closer to the theoretical surface roughness.
For the same material, larger grain structures result in higher surface roughness after machining. Therefore, heat treatments such as quenching and tempering before machining can increase material hardness, reduce plasticity, refine grain structure, and decrease surface roughness.
Proper selection of cutting fluid can reduce deformation and friction, suppress built-up edges and scales, lower cutting temperature, thus helping to reduce surface roughness.
II. Factors affecting surface roughness after grinding
1. Grinding wheel
The main factors affecting surface roughness after grinding include the grain size, hardness, structure, material, dressing, and rotational balance quality of the grinding wheel.
Finer grain size means more abrasive grains per unit area, resulting in finer and more uniform scratches on the machined surface, thus lower surface roughness. Of course, the corresponding depth of cut should also be smaller, otherwise, it may clog the wheel and cause burning.
The hardness of the grinding wheel refers to the ease with which abrasive grains detach from the wheel. Its selection depends on the workpiece material and processing requirements. If the wheel is too hard, dull grains won’t detach; if too soft, grains detach too easily. Both scenarios weaken the cutting action of the grains, making it difficult to achieve lower surface roughness.
Structure refers to the proportion of abrasive grains, bonding agent, and pores. A dense structure can achieve high precision and low surface roughness. A loose structure is less likely to clog and is suitable for machining softer materials.
The material of the grinding wheel refers to the abrasive. When selecting abrasives, both machining quality and cost should be considered. For example, diamond wheels can achieve extremely low surface roughness but at a higher processing cost.
Wheel dressing greatly affects the ground surface roughness. Through dressing, the wheel can have the correct geometric shape and sharp micro-edges. The quality of wheel dressing is closely related to the dressing tool used and the longitudinal feed rate during dressing.
Using a single-point diamond dresser with a very small longitudinal feed rate can produce a wheel that achieves very low surface roughness. The rotational balance quality of the grinding wheel also affects the ground surface roughness.
2. Grinding parameters
The main grinding parameters include wheel speed, workpiece speed, feed rate, grinding depth (depth of cut), and number of spark-out passes.
Higher wheel speed vs means each abrasive grain removes less material per unit time, reducing cutting forces, creating a shallower heat-affected zone, more scratches per unit area, and possibly outpacing the material’s plastic deformation speed, thus resulting in lower surface roughness. Higher vs also increases productivity, which is why high-speed grinding is developing rapidly.
The effect of workpiece speed vg on surface roughness is opposite to that of vs ; higher vg increases surface roughness. Smaller axial feed rate f means less length processed per unit time, thus lower surface roughness.
The depth of cut ap has a significant impact on surface roughness. Reducing ap will decrease plastic deformation of the workpiece material, thus reducing surface roughness, but it will also lower productivity.
To address this, the grinding process can start with a larger a p , then use a smaller a p , and finally perform several spark-out passes with only axial feed and no transverse feed.
Additionally, the properties of the workpiece material and the selection and use of cutting fluid also have significant effects on the ground surface roughness.
III. Main factors affecting the physical and mechanical properties of the surface layer
1. Cold work hardening of the machined surface
During machining, the microhardness of the machined surface is the result of the combined effects of cold work hardening due to plastic deformation, material softening due to cutting heat, and hardness changes caused by metallographic structure alterations.
Cutting forces cause plastic deformation in the metal surface layer, shear slip between grains, lattice distortion, grain elongation, fragmentation, and fibrization, leading to strengthening of the surface layer material, increasing strength and hardness.
The effect of cutting heat on hardening is more complex. When the temperature is below the phase transformation temperature, cutting heat softens the surface layer and may cause recovery and recrystallization in the plastically deformed layer, weakening the material. Higher temperatures will cause phase transformations, in which case the hardness changes after transformation need to be considered in conjunction with cooling conditions.
In turning, milling, planing, and other cutting processes, plastic deformation caused by cutting forces plays a dominant role, and work hardening is more pronounced. Grinding temperatures are much higher than cutting temperatures, so in the grinding process, softening or metallographic structure changes determined by grinding heat and cooling conditions often play a dominant role.
If the grinding temperature significantly exceeds the tempering temperature of the material but remains below the phase transformation temperature, the thermal effect will soften the material, resulting in lower hardness sorbite or troostite.
If grinding hardened steel, its surface temperature has exceeded the phase transition temperature. Due to the highest temperature on the outermost layer and sufficient cooling, a secondary quenched martensite with relatively high hardness is generally obtained. The temperature of the sub-outer layer is slightly lower and the cooling is insufficient, resulting in a tempered structure with lower hardness. Therefore, the surface layer hardness of the workpiece is relatively higher in the outermost layer and slightly lower in the sub-outer layer compared to the overall material.
The main factors affecting surface layer cold work hardening are as follows:
(1) Cutting force
The greater the cutting force, the larger the plastic deformation, and the more severe the work hardening. Therefore, increasing the feed rate f, depth of cut ap , and reducing the tool rake angle γo and clearance angle αo will all increase the cutting force, resulting in severe cold work hardening.
(2) Cutting temperature
The higher the cutting temperature, the greater the softening effect, reducing the degree of hardening.
(3) Cutting speed
When the cutting speed is very high, the contact time between the tool and the workpiece is very short, and the deformation speed of the cut metal is very fast, which will result in insufficient plastic deformation of the machined surface metal, and consequently, the resulting work hardening will be correspondingly smaller.
The influencing factors in the above three aspects are mainly the geometric parameters of the tool, cutting parameters, and mechanical properties of the machined material. Therefore, measures to reduce surface layer cold work hardening can be considered from the following aspects:
- Reasonably select the geometric parameters of the tool, try to use larger rake and clearance angles, and minimize the cutting edge radius when grinding.
- Reasonably select cutting parameters, use higher cutting speed v, smaller feed rate f, and smaller depth of cut ap .
- When using tools, the wear degree of the back face should be reasonably limited.
- Use cutting fluid appropriately; good cooling and lubrication can reduce cold work hardening.
2. Surface layer metallographic structure changes and grinding burns
During the cutting process, the temperature of the machined surface will rise due to the action of cutting heat in the machining area. When the temperature rises above the critical point of metallographic structure transformation, changes in the metallographic structure will occur.
The energy consumed to remove a unit volume of material during grinding is often dozens of times that of other cutting processes. Most of this large energy consumption is converted into heat. Due to the small size of grinding chips and the poor thermal conductivity of the grinding wheel, about 70% or more of the heat instantly enters the workpiece during grinding.
The temperature in the grinding zone can reach 1500-1600°C, which exceeds the melting point of steel; the surface layer temperature of the workpiece can reach above 900°C, exceeding the phase transition temperature Ac3 . Combined with different cooling conditions, the metallographic structure of the surface layer can undergo quite complex changes.
(1) Main types of grinding burns
Taking quenched steel as an example to analyze grinding burns. During grinding, if the surface layer temperature of the workpiece exceeds the phase transition temperature Ac 3 (about 720°C for general medium carbon steel), the surface layer transforms into austenite.
At this time, if there is sufficient cutting fluid, the surface layer rapidly cools to form secondary quenched martensite, which has higher hardness than tempered martensite, but the hardness layer is very thin, with tempered sorbite or troostite underneath. At this time, the overall surface hardness decreases, which is called quenching burn.
If there is no cutting fluid after the surface layer transforms to austenite, the surface layer is annealed, and the hardness drops sharply, which is called annealing burn. If the grinding temperature is between the phase transition temperature and the martensite transformation temperature (about 300-720°C for medium carbon steel), martensite transforms into tempered troostite or sorbite, which is called tempering burn.
(2) Main factors affecting grinding burns and prevention measures
Factors affecting grinding burns include grinding parameters, workpiece material, grinding wheel performance, and cooling conditions.
Regardless of the type of burn, if it is severe, it will reduce the service life of the part multiple times, or even make it completely unusable.
Therefore, to avoid burns during grinding, the root cause of grinding burns is excessively high temperature in the grinding zone. Thus, it is necessary to reduce the generation of grinding heat and accelerate the dissipation of grinding heat to avoid grinding burns. Specific measures are as follows:
1) Reasonably select grinding parameters.
The depth of cut a p has the greatest impact on the increase of grinding temperature, so from the perspective of reducing burns, it should not be too large. Increasing the feed rate f will increase the grinding power and heat generation rate in the grinding zone per unit time, but the area of the heat source will also increase, and the increase in exponent is even greater, thus reducing the heat generation rate per unit area in the grinding zone. Therefore, increasing f is beneficial for both improving productivity and reducing burns.
When the workpiece speed vg increases, the surface layer temperature t b of the workpiece will increase, but the contact time between the surface and the heat source is short, making it difficult for heat to penetrate into the inner layer, and the burn layer will become thinner. A very thin burn layer may be removed in subsequent no-feed grinding, or fine grinding, lapping, polishing, and other processes.
From this perspective, the issue is not whether there is surface burn, but how deep the burn layer is. Therefore, it can be considered that increasing vg can both reduce grinding burns and improve productivity. Increasing vg alone will increase the surface roughness value; to reduce the roughness value, the grinding wheel speed vs can be appropriately increased simultaneously.
2) Reasonably select the grinding wheel and dress it in a timely manner.
First, reasonably select the grinding wheel. Generally, do not use wheels that are too hard to ensure that the wheel has good self-sharpening ability during the grinding process. When selecting abrasives, consider their adaptability to grinding different workpiece materials.
Using rubber-bonded wheels helps reduce surface burns because this type of bond has some elasticity, allowing the abrasive grains to automatically retract when subjected to excessive cutting forces, reducing the depth of cut and thus reducing cutting forces and surface layer temperature. The smaller the grain size of the wheel, the easier it is for chips to clog the wheel, and the more likely the workpiece is to burn. Therefore, it is better to choose softer, larger-grained wheels.
Increasing the spacing between grinding edges can cause intermittent contact between the wheel and the workpiece, shortening the heating time of the workpiece and improving heat dissipation conditions, which can effectively reduce the degree of thermal damage.
When the grinding wheel becomes dull, most abrasive grains only compress and rub on the machined surface without cutting action, causing the grinding temperature to rise. Therefore, the wheel should be dressed in a timely manner.
3) Improve cooling methods and enhance cooling effects.
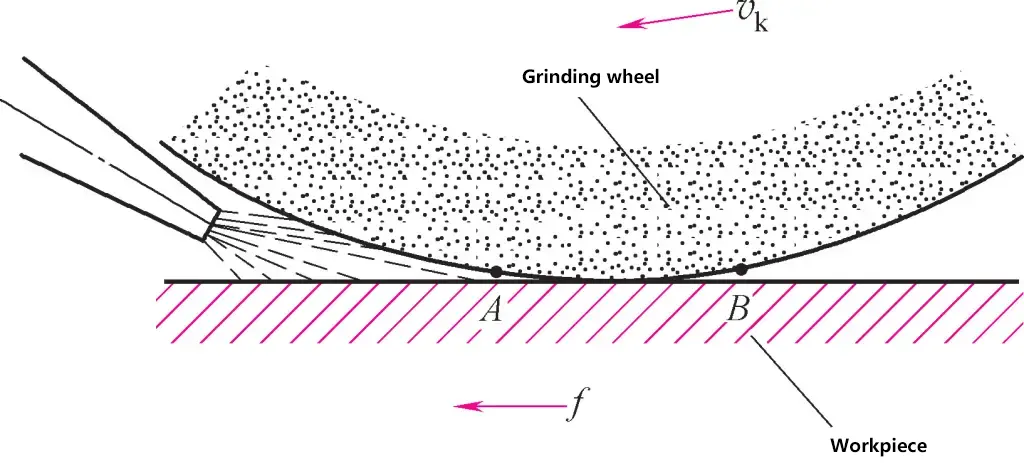
Using cutting fluid can improve cooling effects and avoid burns. The key is how to deliver the cutting fluid into the cutting zone. When using general cutting methods (Figure 2), i.e., conventional nozzle pouring cooling method, due to the high-speed rotation of the grinding wheel, strong airflow is generated on the surface, making it difficult for the cutting fluid to enter the grinding zone. Often, it is only sprayed in large quantities on the machined surface that has already left the grinding zone, resulting in poor cooling effects.

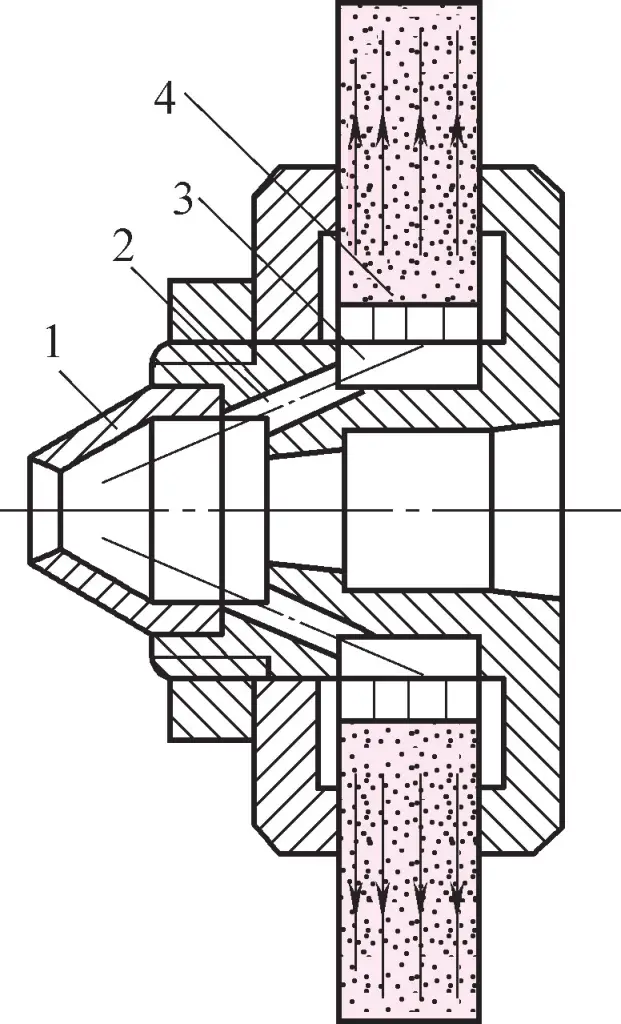
Generally, the following improvement measures can be adopted: ① High-pressure, high-flow cooling to enhance the cooling effect and rinse the grinding wheel surface. However, the machine tool must be equipped with a protective cover to prevent cutting fluid splashing. ② Internal cooling introduces cutting fluid into the center cavity of the grinding wheel through a hollow conical cover (Figure 3), and then enters the grinding area directly through the pores of the grinding wheel under the action of centrifugal force.

1—Conical cover
2—Cutting fluid passage
3—Grinding wheel center cavity
4—Thin-walled sleeve with radial small holes
However, this method requires the grinding wheel to be porous, and due to the large amount of water mist during cooling, a protective cover is required.
4) Install air baffles.
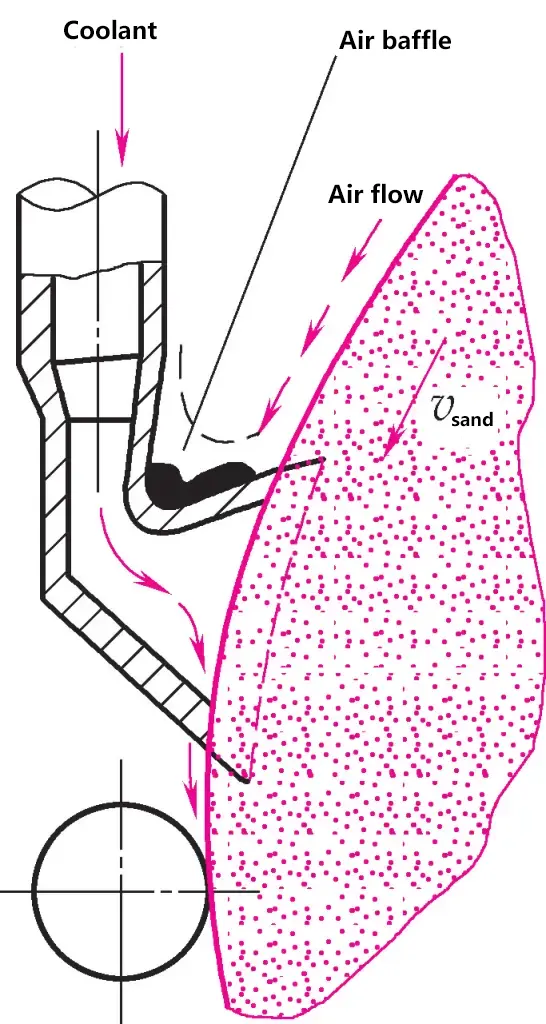
The baffle above the nozzle is close to the surface of the grinding wheel, reducing the high-pressure attached airflow on the surface of the high-speed rotating grinding wheel. The cutting fluid is sprayed into the grinding area at an appropriate angle (Figure 4). This method is very useful for high-speed grinding.

3. Residual stress in the machined surface layer
During the machining process, when the machined surface layer undergoes changes in shape, volume, or microstructure relative to the base material, residual stress will be generated in the surface layer. The stress in the outer layer is opposite in sign to that in the inner layer, and they balance each other.
There are three main reasons for the generation of residual stress in the surface layer:
(1) Cold plastic deformation
Cold plastic deformation is mainly caused by cutting forces. During the machining process, the machined surface is subjected to tensile stress due to cutting forces. The stress in the outer layer is larger, causing elongation plastic deformation, increasing the surface area; the stress in the inner layer is smaller, in an elastic deformation state.
After the cutting force is removed, the inner layer material tends to recover, but is restricted by the plastically deformed metal in the outer layer. Therefore, there is residual compressive stress in the outer layer, and residual tensile stress in the sub-outer layer to balance it.
(2) Thermal plastic deformation
Thermal plastic deformation is mainly caused by cutting heat. The workpiece expands under the action of cutting heat, with the outer layer temperature higher than the inner layer, so the thermal expansion of the outer layer is more severe, but the lower temperature of the inner layer will hinder the expansion of the outer layer, thus producing thermal stress.
The outer layer is under compressive stress, and the sub-outer layer is under tensile stress. When the temperature of the outer layer is high enough and the thermal stress exceeds the yield limit of the material, thermal plastic deformation will occur, and the outer layer material will relatively shorten under the action of compressive stress.
When the cutting process ends and the workpiece temperature drops to room temperature, the outer layer will not be able to fully contract due to the thermal plastic deformation that has already occurred, and the material has relatively shortened. It is also restricted by the substrate, thus producing tensile stress in the outer layer and compressive stress in the sub-outer layer.
(3) Microstructure changes
When the cutting temperature is high enough to exceed the phase transformation temperature Ac₃ of the material, it will cause phase transformation in the surface layer. Different microstructures have different densities, so phase transformation will cause volume changes.
Due to the restriction of the base material, compressive stress will be generated when the surface layer expands in volume, and tensile stress will be generated when it shrinks. The density values of various common microstructures are: martensite ρ₀ ≈ 7.75g/cm³, pearlite ρ₁ ≈ 7.78g/cm³, ferrite ρ₂ ≈ 7.88g/cm³, austenite ρ₃ ≈ 7.96g/cm³.
Taking grinding hardened steel as an example, the original structure of hardened steel is martensite. After grinding, the surface layer may undergo tempering, causing martensite to transform into troostite or sorbite with a density close to pearlite, increasing density and reducing volume, producing residual tensile stress in the surface layer.
If the surface temperature exceeds the phase transformation temperature Ac₁ and cooling is sufficient, the retained austenite in the surface layer will transform into martensite again, expanding in volume, producing residual compressive stress in the surface layer.
In actual production, the residual stress in the surface layer after machining is the result of the combined effects of the above three factors. The technological factors affecting residual stress are quite complex.
In general, factors that reduce plastic deformation and lower processing temperature help to reduce the residual stress value of the machined surface. For cutting processes, technological measures that reduce the degree of work hardening are generally beneficial for reducing residual stress.
For grinding processes, measures that can reduce surface thermal damage are beneficial for avoiding or reducing residual tensile stress. When the residual stress in the surface layer exceeds the strength limit of the material, cracks will occur on the material surface.

