I. Balancing of the grinding wheel
To improve grinding quality, maintain the precision of the grinding machine, and ensure production safety, it is necessary to balance the grinding wheel.
The imbalance of the grinding wheel is caused by the misalignment of the wheel’s center of gravity with the axis of rotation, mainly due to incorrect manufacturing and installation. The grinding wheel operates at high rotational speeds, and if its mass is slightly uneven, it will generate a large unbalanced centrifugal force during rotation. This causes the machine to vibrate, greatly reducing grinding quality, severely wearing the grinding wheel spindle bearings, and in serious cases, may cause the wheel to shatter and lead to accidents.
Therefore, grinding wheels must undergo static or dynamic balancing, especially for precision grinding or mirror-finish grinding, which requires more precise balancing. Generally, grinding wheels with a diameter larger than 125mm need to be balanced.
Balancing grinding wheels usually employs the moment balancing method, including static and dynamic balancing. Currently, static balancing is widely used for grinding wheels, which is performed on a balancing stand. High-speed CNC grinding machines are usually equipped with automatic online dynamic balancing devices for grinding wheels.
1. Static balancing of the grinding wheel
The essence of static balancing a grinding wheel is the manual process of adjusting the offset of the grinding wheel assembly’s center of gravity by adjusting balancing weights to align the wheel’s center of gravity with the axis of the balancing shaft.
The main supporting tool for static balancing is the grinding wheel balancing stand. There are cylindrical balancing stands for balancing large diameter wheels, and knife-edge balancing stands for balancing smaller diameter wheels.
As shown in Figure 1, the static balancing stand consists of a support frame 1 and two parallel shafts 2 of the same diameter. The two shafts serve as the rails for static balancing and require low surface roughness and high hardness. When in use, they must be positioned horizontally and at the same level.
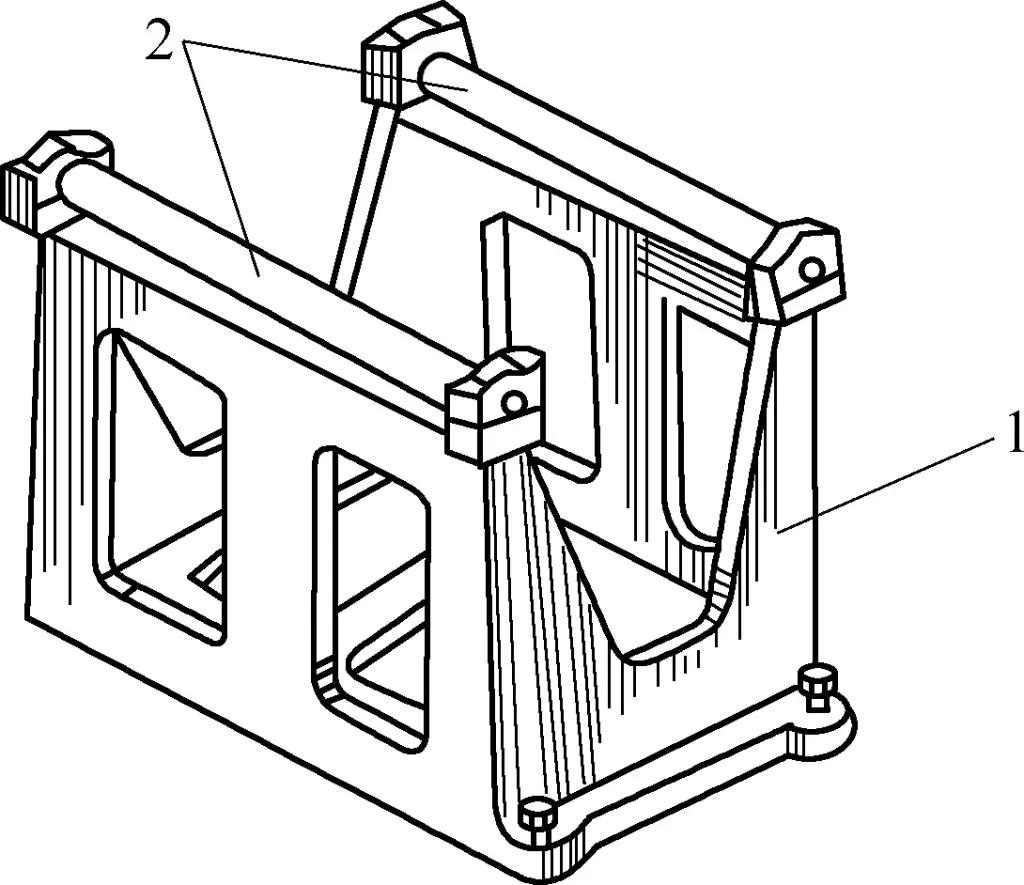
1—Support frame
2—Shaft
The indicator for static balancing is that the grinding wheel can remain stationary at any position on the horizontal rails.
2. Installation of the grinding wheel
(1) Precautions for using grinding wheels
Grinding wheels are fragile tools, unrelated to appearance, so special care must be taken during inspection, handling, or storage. Relatively minor impacts can cause cracks in the wheel, and any crack can lead to wheel bursting during the grinding process. Therefore, extra caution is necessary during operation, especially during transportation.
When operating grinding wheels, follow these three principles:
1) Never drop or impact the grinding wheel. Do not use wheels that have been dropped, impacted, or found to have abnormalities upon inspection.
2) Avoid using grinding wheels that are wet or oily.
3) Store grinding wheels in a dry place (avoid excessive heat or moisture). When placing wheels on shelves, store them vertically to prevent undue pressure on the wheels. Keep wheels in their packaging until ready for use. When transporting wheels, do not lay them flat and stack them.
(2) Installing the grinding wheel on the wheel flange
1) Ensure that the left and right wheel flanges have the same diameter, the same contact area with the wheel, and are free from cracks, dust, and rust.
2) When securing the grinding wheel between the wheel flanges, insert a paper sealing gasket (supplied with the wheel) between each flange and the wheel side. The thickness of the left and right gaskets must be the same, with a diameter larger than the wheel flange diameter, and free from dirt or damage.
3) After inserting the wheel flanges into the grinding wheel hole, slowly rotate the wheel clockwise and counterclockwise to symmetrically fit the flanges into the hole. Do not use a hammer to force it in.
4) Tighten the clamping bolts of the wheel flanges alternately in a diagonal pattern using the same torque. For final tightening, use a torque wrench. The final tightening is done in 3 steps: ① Use 2/3 of the required torque; ② Use a torque less than the required value by 1 scale mark; ③ Use the required torque (torque value according to the manufacturer’s specifications).
3. Balancing the grinding wheel
As shown in Figure 2.
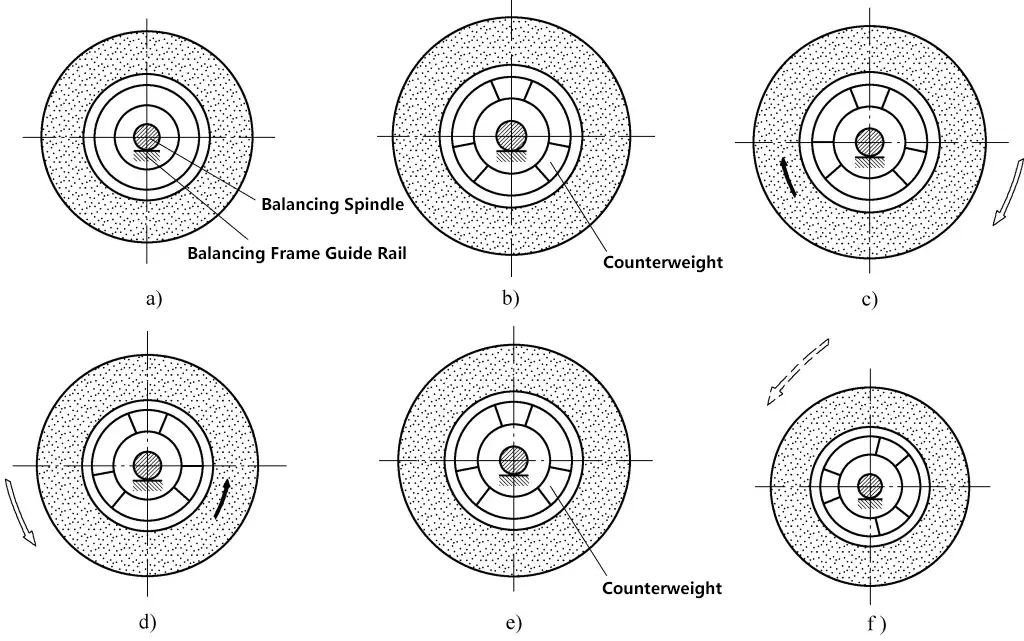
(1) Level the grinding wheel balancing table using a spirit level.
Clean the contact surface of the balancing table where the balancing shaft will be placed.
(2) Place the grinding wheel on the balancing table, then balance the wheel following these steps.
- Place the grinding wheel on the balancing table. The lighter part will be at the top, as shown in Figure 2a.
- Install 3 balancing weights on the wheel (equally spaced), as shown in Figure 2b.
- If the wheel rotates to the right, slide the left balancing weight upward, as shown in Figure 2c.
- If the wheel rotates to the left, slide the right balancing weight upward, as shown in Figure 2d.
- Repeat steps three and four until the wheel stops rotating, then fully secure the balancing weights.
- If the wheel stops rotating after manually turning it 90°, the balancing is complete.
For precision grinding and mirror-finish grinding wheels, balancing should be performed in at least eight positions. Additionally, the initially balanced wheel should be installed on the machine for dressing, then balanced again until satisfactory.
(3) After balancing the grinding wheel, install it on the machine for dressing.
If the wheel becomes unbalanced again after dressing, repeat the balancing process following the steps above.
4. Precautions when balancing the grinding wheel
1) The balancing stand should be adjusted to a horizontal position, especially the longitudinal direction should be finely adjusted to level (the error in leveling will be determined by the error value of the mercury column; generally, different precision mercury columns are selected according to the machining accuracy of the machine tool).
2) The inner tapered hole of the flange and the balancing center shaft should fit well, and their mating surfaces should be free from scratches, rust marks, or other defects.
3) New grinding wheels are generally not perfectly round, so they should be roughly balanced first, then preliminarily dressed before proceeding with final balancing.
5. Quality of static balance of grinding wheel
The quality of static balance of the grinding wheel directly affects the grinding quality, especially in high-speed grinding. The amplitude of the wheel after balancing should be checked to determine if rebalancing is necessary.
The relationship between the balance quality of the grinding wheel and the amplitude is shown in Table 1.
Table 1 Relationship between balance quality of grinding wheel and amplitude
| Measurement location | Vibration direction | Amplitude/mm | |
| Good balance quality | Good balance quality | ||
| Front end of spindle (near grinding wheel end) | Horizontal | ≤0.3 | ≤1.2 |
| Vertical | ≤0.2 | ≤0.25 | |
| Rear end of spindle (near pulley end) | Horizontal | ≤0.2 | ≤0.9 |
| Vertical | ≤0.2 | ≤0.15 | |
Generally, new grinding wheels need to be balanced twice. First balance before dressing the wheel, then after mounting on the machine, dress the outer diameter and both end faces of the wheel, then remove it and perform the second balance. Sometimes, after using the wheel for a while, if polygonal vibration marks are found on the workpiece, the wheel needs to be removed and rebalanced before further use.
6. Dynamic balance of grinding wheel
For multi-wheel grinding and shaped wheel grinding, to achieve the force couple balance of the wheel, dynamic balancing is generally carried out on a dynamic balancing machine.
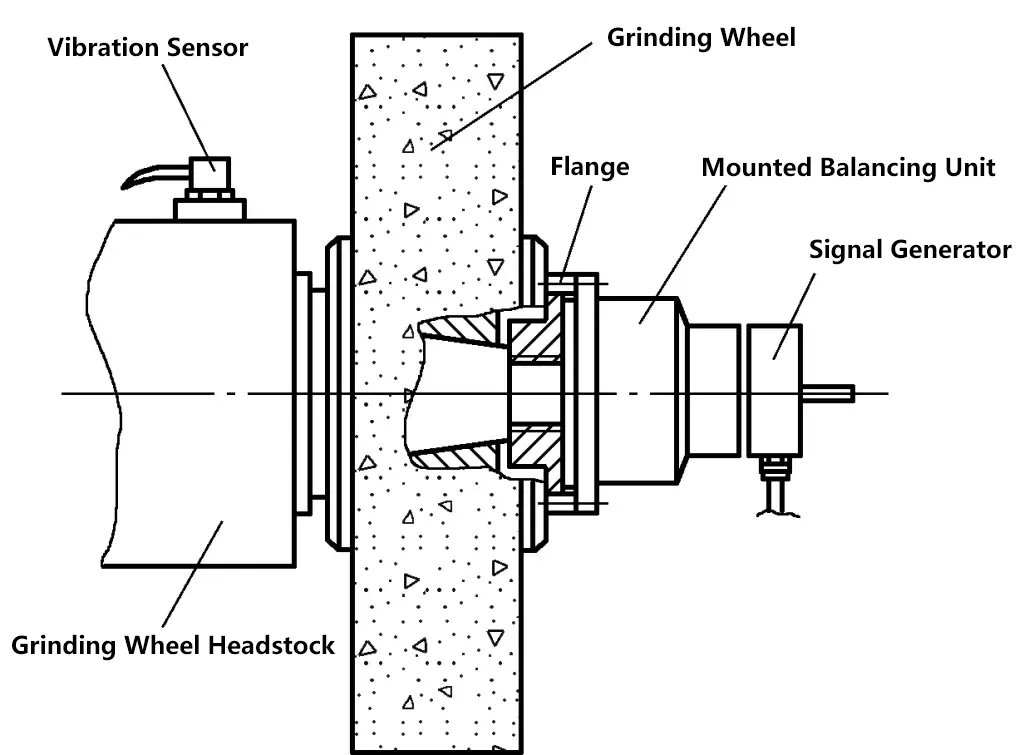
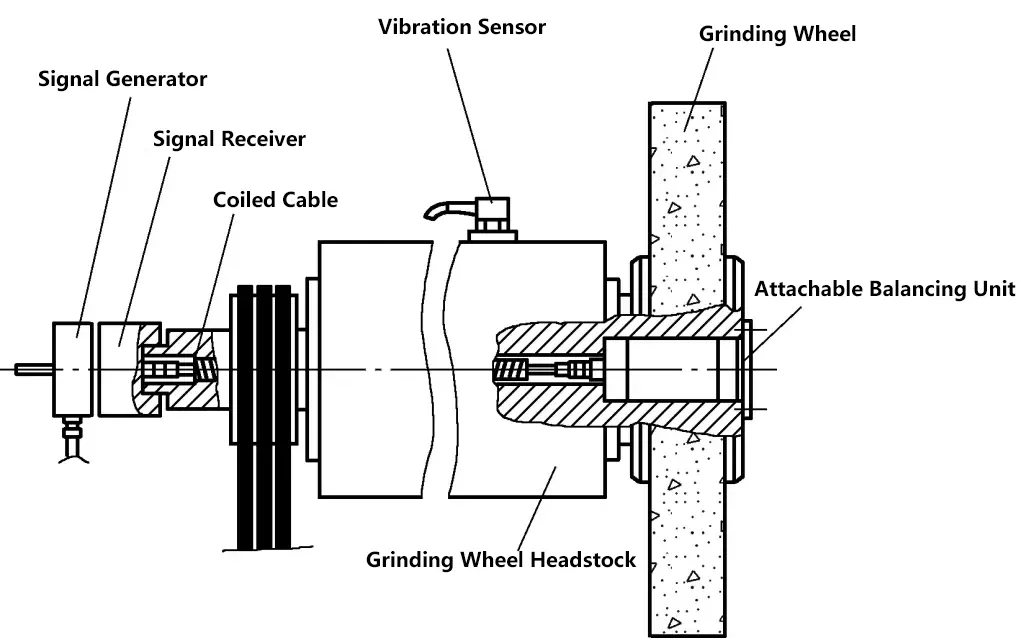
Especially for high-speed CNC grinding machines, due to the high rotational speed of the wheel, to ensure workpiece quality during batch processing, CNC grinding machines are generally equipped with wheel balancing instruments. Wheel balancing instruments are generally of two types: manual and automatic. Here we mainly introduce the automatic wheel balancing instrument.
Automatic wheel balancing instruments are divided into two types based on their installation method on the grinding wheel spindle: internal (see Figure 3) and external (see Figure 4). Regardless of the type, the main device consists of a display, a sensor installed on the wheel frame to collect vibration, a balancing unit installed on the flange or spindle bore, and a signal generator.
II. Dressing of grinding wheel
After using a grinding wheel for a period of time, it will become dull and lose its grinding ability or correct geometric shape. Wheel dulling generally occurs in forms such as abrasive grain dulling, adhesion of abrasive grains and grinding debris, wheel clogging, and wheel shape distortion.
Grinding wheel dressing tools are used to dress the dulled working surface of the wheel to restore its cutting performance and correct geometric shape. The sharpness of the abrasive grains on the wheel’s working surface and whether the profile shape is distorted directly affect the grinding efficiency and the surface quality of the processed workpiece.
For workpieces with surface roughness less than Ra1.6μm and for form grinding, fine dressing of the wheel is necessary.
Modern CNC grinding machines for high-efficiency and high-precision form grinding have adopted automatic wheel dressing after grinding each workpiece or continuous wheel dressing technology, thus ensuring the surface roughness, shape, dimensional accuracy, and high productivity of the workpiece. Timely dressing of the wheel is one of the important measures to eliminate certain grinding defects, improve grinding quality, and increase grinding efficiency.
1. Basic principles of dressing grinding wheels
The fineness of wheel surface dressing and the dressing method adopted should be determined based on the nature of the wheel, workpiece material, surface precision requirements of the workpiece, and processing form.
- For high surface precision requirements of the workpiece, the wheel dressing should be coarse.
- For hard workpiece materials with large contact areas, the wheel dressing should be coarse.
- Rough grinding requires coarser wheel dressing than fine grinding.
- When lateral and longitudinal feed rates are high, the wheel surface should be coarse.
- For high-precision grinding with low surface roughness values, the wheel should be given additional light dressing passes.
2. Basic methods of dressing grinding wheels
The basic methods of dressing grinding wheels can be divided into three categories: turning method, roll pressing method, and grinding method. Common grinding wheel dressing tools are shown in Figure 5.
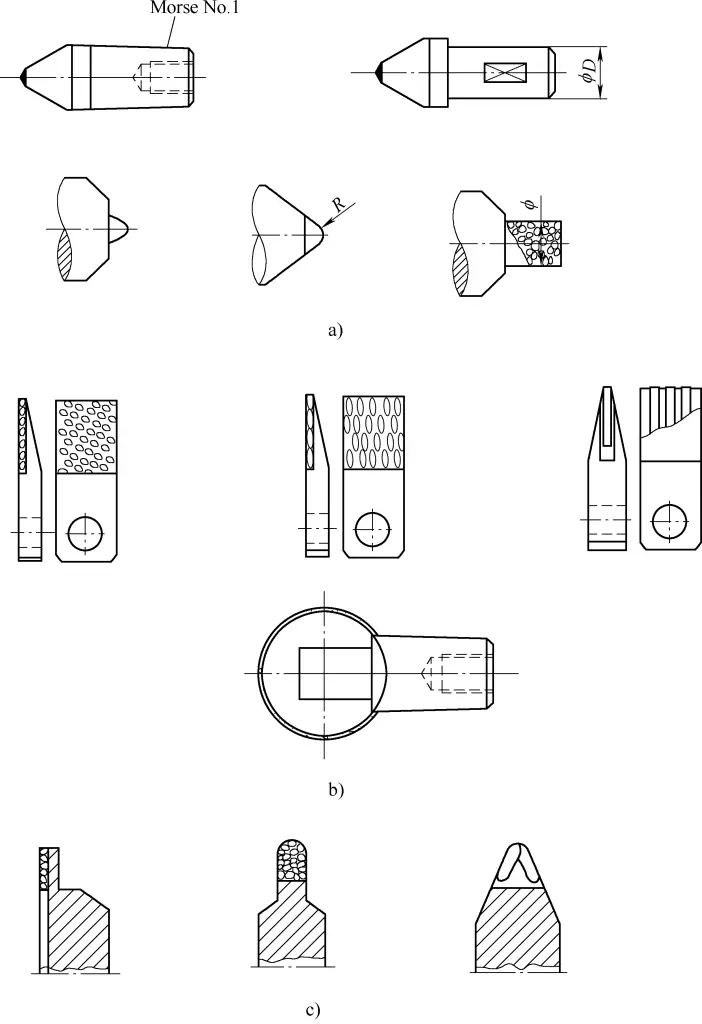
a) Dressing pen
b) Dressing plate
c) Dressing wheel

