How to Remove Nickel Plating from Copper: A Step-by-Step Guide
Removing nickel plating from copper can seem like a daunting task, especially if you’re concerned about preserving the integrity of…
Copper stains on your beautiful stone surfaces can be an eyesore, diminishing the aesthetic appeal of your home. You might be wondering, “How can I effectively remove these stubborn stains without causing damage?” You’re in the right place. This article will walk you through a detailed, step-by-step guide to safely and efficiently eliminate copper stains from stone surfaces.
We’ll start by helping you understand what copper stains are and why they occur, then move on to preparing the right tools and materials. From there, you’ll learn a straightforward process involving cleaning, preparing and applying a poultice, and allowing it to work its magic on the stain. Finally, we’ll provide tips for maintaining your stone surfaces to prevent future staining. By the end of this guide, you’ll have all the knowledge and confidence you need to restore your stone surfaces to their original beauty.
Copper stains are green or bluish-green discolorations on surfaces caused by the oxidation of copper. These stains are common on stone surfaces exposed to copper features such as statues, decorative fixtures, or roofing materials. The oxidation process occurs when copper reacts with moisture and air, leading to the formation of copper carbonate, which gives the stains their characteristic hue.
Copper stains can vary in appearance and severity, depending on factors such as the type of stone, the extent of copper exposure, and environmental conditions. The primary types of copper stains include:
Copper stains primarily result from the oxidation of copper elements, rainwater runoff carrying dissolved copper ions, and environmental factors like high humidity and pollution. Understanding these causes is crucial for effective removal and prevention.
Different stone surfaces have varying susceptibility to copper stains. Marble, being soft and porous, is prone to deep staining. Granite, though less porous, can still be affected with prolonged exposure. Highly porous stones like limestone and sandstone are particularly vulnerable to rapid penetration and spread of copper stains.
To identify copper stains on stone surfaces, look for the following characteristics:
Understanding the nature, causes, and identification of copper stains on stone surfaces is the first step in effectively addressing and preventing these unsightly marks. By recognizing the types of stone affected and the environmental factors contributing to copper staining, you can better plan for their removal and long-term prevention.
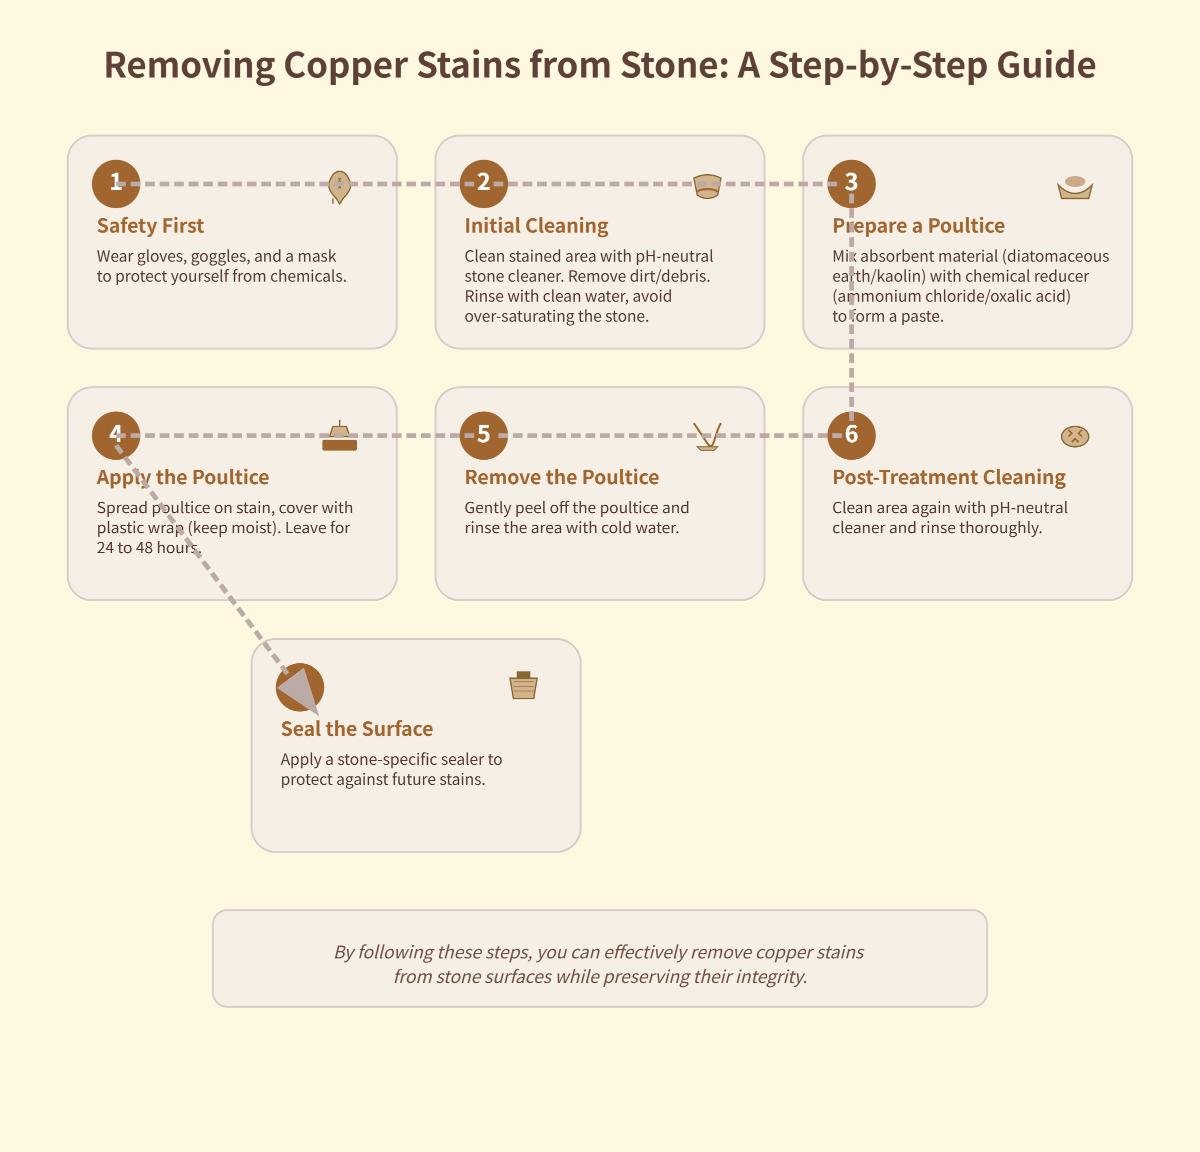
Before you start removing copper stains from stone surfaces, make safety your top priority. Wear appropriate protective gear, including gloves, goggles, and a mask, to protect your hands, eyes, and lungs from chemicals and fumes. Ensure the work area is well-ventilated by opening windows or using fans.
Gather all the necessary tools and materials before you begin the stain removal process. You’ll need a pH-neutral stone cleaner, absorbent materials like clay or diatomaceous earth, and chemical reducers such as ammonium chloride or oxalic acid. Alternatively, products like Iron Out can also be effective. Other essential tools include a fiber bristle brush for scrubbing, plastic sheeting to cover the poultice and retain moisture, and cotton-wool pads for applying alternative stain-removal solutions.
Before treating the entire stained area, test a small, hidden section to ensure the treatment doesn’t discolor or damage the stone. Wait for the patch-tested area to dry and observe any changes. If the patch test shows no negative effects, confidently proceed with removing the copper stains from the larger area.
Start by giving the stained area a thorough clean to remove any dirt or debris on the surface. Use a pH-neutral stone cleaner to ensure no additional chemicals interfere with the stain removal process. Apply the cleaner with a soft cloth or sponge and gently scrub the area to prepare it for the next steps.
You will need absorbent materials (like clay, diatomaceous earth, or kaolin), chemical reducers (such as ammonium chloride for light-colored stones or oxalic acid for darker stones), plastic wrap, and painter’s tape.
To make the poultice, mix one part of your chosen chemical reducer (ammonium chloride for light-colored stones or oxalic acid for darker stones) with four parts absorbent material. Gradually add water until the mixture reaches a thick, pasty consistency.
Spread the prepared poultice evenly over the stain, ensuring a quarter-inch thick layer that extends slightly beyond the stain’s edges. Cover with plastic wrap and seal with painter’s tape to keep it moist.
Allow the poultice to sit on the stain for 24 to 48 hours. During this time, the poultice will work to draw the copper stain out of the stone.
Gently remove the dried poultice using a wooden spatula to avoid scratching the stone surface. Carefully peel off the plastic wrap and dispose of the poultice material.
Thoroughly rinse the treated area with clean water to remove any remaining poultice material. Use a soft cloth to dry the surface. If the stain persists, repeat the poulticing process.
After removing copper stains, inspect the stone surface carefully. Look for any remaining stains or discoloration, examining the surface in different lighting conditions to ensure no areas were missed. If any stains persist, perform additional cleaning using a pH-neutral cleaner to gently scrub the affected areas. Avoid harsh chemicals that could damage the stone. For persistent stains, consider repeating the poultice application or consulting a professional.
Maintaining the stone surface properly helps prevent future copper stains. Here are some long-term maintenance tips:
Applying a protective coating or sealant can help safeguard the stone from future stains. Choose a sealant specifically designed for your type of stone and follow the manufacturer’s instructions for application.
Regularly inspect the stone surface for signs of new stains. Early detection allows for prompt treatment, preventing stains from becoming deeply embedded.
When faced with tough stains, it’s smart to call in the pros. Stone restoration experts have the knowledge and tools to handle difficult stains without damaging the stone.
Establish a regular cleaning schedule for your stone surfaces. Use a pH-neutral, stone-safe cleaner to remove dirt and dust. This helps to prevent potential stains. Avoid harsh chemicals as they can damage the stone and make it more susceptible to stains. Wipe down the surfaces weekly with a soft cloth dampened with the cleaner.
Clean up any spills on the stone surface immediately. This is crucial for substances that can cause stains, like those containing copper. Blot the spill with a clean cloth, and then clean the area with the pH-neutral cleaner.
Opt for the best sealant for your stone. Select a high-quality impregnating sealer designed for your type of stone. Penetrating sealants soak into the stone, reducing its absorbency and making it less likely to absorb copper stains. Surface sealants form a protective layer on top of the stone. Follow the manufacturer’s instructions for application.
Before applying the sealant, clean the stone surface thoroughly to ensure it is free of dirt and debris. Use a brush or roller to apply the sealant evenly, and allow it to dry completely. Depending on the type of sealant, you may need to apply multiple coats.
When installing copper fixtures, choose designs that minimize runoff. Opt for fixture designs with proper drainage systems to prevent water from dripping onto the stone surface. Place a barrier between the copper fixture and the stone surface. This can be a non-porous material that prevents direct contact between the copper and the stone, reducing the risk of copper stains.
Regularly inspect the areas around copper fixtures for signs of oxidative runoff. Look for greenish discoloration or other signs of copper oxidation. Clean the areas around copper fixtures regularly to prevent the buildup of copper-containing substances. Remove any leaves, dirt, or debris that may collect around the fixtures and could potentially carry copper ions onto the stone surface.
While more commonly used for general cleaning, electrostatic disinfection and UV-C light can help maintain surfaces that are less prone to staining. Electrostatic disinfection evenly distributes cleaning agents on the stone surface, while UV-C light can help break down organic matter that may contribute to staining.
Nanotechnology tools can clean small pores and crevices thoroughly, removing dirt and substances that could cause stains.
Below are answers to some frequently asked questions:
To remove copper stains from stone surfaces, follow these steps:
By following these steps, you can effectively remove copper stains from stone surfaces while preserving their integrity.
To effectively prevent copper stains on stone surfaces, regular maintenance and protective measures are essential. Firstly, applying a sealant or protective coating to the stone surface can create a barrier that prevents copper ions from penetrating the stone. Regularly cleaning the stone with mild, non-abrasive cleaners helps to remove any potential staining agents before they can cause damage. Additionally, ensuring that copper items, such as decorative pieces or fixtures, are kept dry and free from moisture can significantly reduce the risk of stains. In areas prone to moisture, like bathrooms, installing a water softener can help reduce mineral content in the water, which contributes to staining. By following these preventative methods, the stone surfaces will remain clean and maintain their aesthetic appeal.
A poultice is a paste-like mixture used to remove stains from natural stone and other porous surfaces. It is made by combining a powdered absorbent material, such as talcum powder or baking soda, with a liquid cleaning agent. The poultice works by breaking down the stain chemically and drawing it out of the stone.
To use a poultice for stain removal, first identify the type of stain to choose the right ingredients. Mix the absorbent material with the cleaning agent until it reaches a thick paste consistency. Spread the poultice evenly over the stain, covering slightly beyond the edges and about a quarter inch thick. Cover with plastic wrap, securing it with tape, and let it sit for 24 to 48 hours. Once dry, remove the poultice with a spatula, rinse the area with clean water, and dry it with a cloth. This method is effective for removing copper stains from stone surfaces.
Yes, there are alternative chemicals to ammonium chloride and oxalic acid for removing copper stains from stone surfaces. Some effective options include:
Always perform a patch test and ensure good ventilation when using these chemicals to avoid damage and health risks.
Copper stains can potentially damage stone surfaces, but such damage is not always permanent if addressed promptly and correctly. Copper stains form when copper or bronze items oxidize and release ions that penetrate stone surfaces, creating green or bluish-green discoloration.
The severity of the damage depends on factors like the type of stone and the stain’s intensity. For example, marble and limestone are more porous and susceptible to deeper staining and etching compared to granite. However, using the right removal methods, like a poultice with ammonium chloride or oxalic acid, can effectively eliminate these stains without causing permanent damage.
It is crucial to avoid harsh chemicals or abrasive tools that could further damage the stone. Regular maintenance and protective sealants can help prevent future staining.