Anchor bolts are crucial components in construction, providing the necessary stability and support for structures subjected to various forces. But what is the proper method for setting these vital fixtures in concrete, and how can you ensure they’re installed correctly to handle tension and shear forces? In this comprehensive guide, we’ll delve into the intricacies of anchor bolts, exploring the differences between cast-in-place and expansion types, and providing a detailed, step-by-step approach to their installation. You’ll also learn about the load capacity, safety standards, and common pitfalls to avoid, ensuring your anchor bolts perform optimally under varying conditions. Ready to master the art of setting anchor bolts and fortify your construction projects? Let’s get started!
Understanding Anchor Bolts
What Are Anchor Bolts?
Anchor bolts are essential components in construction and engineering, used to securely attach objects to concrete or other materials. They provide stability and support for structures, ensuring that they remain fixed and capable of handling various loads and stresses.
Applications of Anchor Bolts
Anchor bolts are used in a wide range of applications, such as:
- Building Foundations: Anchor bolts are used to secure steel columns and beams to concrete foundations.
- Structural Steel Connections: They help connect structural steel to concrete bases in buildings and bridges.
- Heavy Equipment Mounting: Anchor bolts ensure that heavy machinery and equipment remain securely fastened to their bases.
Key Characteristics of Anchor Bolts
Anchor bolts come in various types, each designed for specific applications and load requirements. The primary characteristics to consider include:
- Material: Common materials for anchor bolts include stainless steel, carbon steel, and galvanized steel, selected according to the environment and load needs.
- Diameter and Length: The size of an anchor bolt affects its load-bearing capacity. Larger diameter bolts can handle higher loads.
- Thread Type: The threading on anchor bolts can be coarse or fine, impacting the bolt’s grip and stability in the material.
Types of Anchor Bolts
Cast-in-Place Anchor Bolts
Cast-in-place anchor bolts are embedded into concrete during the pouring process, ensuring precise placement and alignment. These bolts are ideal for heavy-duty applications where high load capacities are required.
Expansion Anchor Bolts
Expansion anchor bolts are inserted into pre-drilled holes in hardened concrete. They expand upon tightening, creating a secure fit. These bolts are suitable for applications where the concrete has already been set, and modifications or additions are needed.
Wedge Anchors
Wedge anchors are a type of expansion anchor that uses a mechanical expansion mechanism. When the nut is tightened, the wedge at the end of the bolt expands, securing the bolt in the concrete. They are commonly used for medium to heavy-duty applications.
Advantages of Using Anchor Bolts
Anchor bolts offer several benefits, including:
- High Load Capacity: They can handle significant loads, making them suitable for structural applications.
- Versatility: Various types of anchor bolts can be used in different materials and environments.
- Ease of Installation: Certain types, like expansion anchors, can be installed quickly and efficiently in existing concrete.
Selecting the Right Anchor Bolt
Choosing the appropriate anchor bolt involves considering the following factors:
- Load Requirements: Determine the load that the bolt needs to support, including both tension and shear forces.
- Environmental Conditions: Assess the environment, including exposure to moisture, chemicals, and temperature fluctuations, to select the right material.
- Installation Method: Decide whether the bolt will be cast-in-place or installed in pre-drilled holes based on the construction process.
Common Installation Mistakes
Avoiding common mistakes during installation is crucial for ensuring the effectiveness of anchor bolts:
- Improper Hole Size: Drilling holes that are too large or too small can compromise the bolt’s grip and stability.
- Incorrect Depth: Failing to drill holes to the correct depth can affect the bolt’s load-bearing capacity and expansion mechanism.
- Over-tightening: Excessive tightening can damage both the bolt and the material, reducing the overall effectiveness.
Maintenance and Inspection
Regular maintenance and inspection are essential for ensuring the longevity and performance of anchor bolts. This includes:
- Visual Inspections: Check regularly for corrosion, wear, or damage.
- Torque Checks: Verify that bolts are tightened to the manufacturer’s specified torque values.
- Load Testing: Periodically test the bolts under load conditions to ensure they maintain their integrity and capacity.
Understanding anchor bolts involves recognizing their importance in construction and engineering, selecting the right type for specific applications, and ensuring proper installation and maintenance. By doing so, anchor bolts can provide reliable and durable fastening solutions for various structures and projects.
Types of Anchor Bolts
Cast-in-Place Anchor Bolts
Cast-in-place anchor bolts, often referred to as L bolts or J bolts, are designed to be embedded into wet concrete during the pouring process. This ensures precise placement and alignment for heavy-duty applications.
Design and Material
These bolts are bent into L or J shapes with threaded ends that remain exposed above the concrete surface. They are commonly made from carbon steel or stainless steel, providing durability and resistance to corrosion.
Applications
Cast-in-place anchor bolts are ideal for securing heavy machinery, structural steel, and foundations. Their robust design makes them suitable for applications requiring high load capacities.
Installation Steps
- Positioning: Place the bolts in the wet concrete before pouring, ensuring correct alignment with a template.
- Embedding: Insert the bent ends into the concrete, leaving the threaded sections exposed.
- Curing: Allow the concrete to harden, typically for 24-48 hours, before attaching structures.
Wedge Anchors
Wedge anchors are expansion anchors that provide a secure fit in pre-drilled holes in concrete, suitable for medium to heavy-duty applications.
Design and Material
These anchors consist of a steel bolt with a slotted expansion sleeve and a tapered wedge. They are available in corrosion-resistant carbon steel or stainless steel.
Applications
Wedge anchors are suitable for securing machinery, railings, and other heavy loads in both cracked and solid concrete.
Installation Steps
- Drilling: Use a hammer drill to create a hole matching the anchor’s diameter and depth.
- Cleaning: Remove debris using a brush or compressed air.
- Insertion: Hammer the anchor into the hole until flush with the surface.
- Tightening: Torque the nut to expand the wedge and secure the anchor.
Sleeve Anchors
Sleeve anchors are expandable anchors designed for light to medium loads, offering versatility in various applications.
Design and Material
They feature an expandable sleeve with a threaded bolt and are typically made from zinc-plated or stainless steel.
Applications
Sleeve anchors are commonly used for mounting shelves, securing HVAC units, and attaching other fixtures to concrete surfaces.
Installation Steps
- Drill Hole: Match the hole size to the anchor’s diameter.
- Insert Anchor: Tap the sleeve into the hole.
- Tighten Bolt: Rotate the nut to expand the sleeve against the concrete.
Drop-In Anchors
Drop-in anchors are designed for overhead fixtures and installations requiring a strong, internal expansion mechanism.
Design and Material
These anchors feature an internal expansion mechanism activated by a setting tool. They are typically made from stainless steel or galvanized steel.
Applications
Drop-in anchors are ideal for securing lighting, pipes, and other overhead fixtures.
Installation Steps
- Drill a hole: Use a carbide-tipped bit to the specified size.
- Insert Anchor: Place the anchor into the hole.
- Activate: Strike the setting tool with a hammer to expand the anchor.
Lag Shield Anchors
Lag shield anchors are used for wood-to-concrete connections, providing a reliable fastening solution for various construction projects.
Design and Material
These anchors consist of a lead or plastic sleeve with internal threads for lag screws. They are made from lead, nylon, or plastic.
Applications
Lag shield anchors are ideal for securing decks, frames, and other wood structures to concrete.
Installation Steps
- Drill Hole: Create a hole slightly larger than the shield’s diameter.
- Insert Shield: Push the shield into the hole.
- Drive Screw: Thread the lag screw into the shield to expand it.
Step-by-Step Guide for Anchor Bolt Installation
- Determine Load Requirements: Select anchors based on shear and tension needs.
- Mark Positions: Use a template to ensure accuracy.
- Drill Holes: Follow manufacturer specifications for depth and diameter.
- Clean Holes: Prevent reduced holding strength from debris.
- Set Anchors: Use the appropriate method, whether hammering, torqueing, or adhesive.
- Cure Time: Allow adhesive-cured anchors (e.g., epoxy types) to cure for 24-72 hours.
Pro Tips
- For cracked concrete: Use wedge or sleeve anchors for added stability.
- Corrosion Resistance: Opt for stainless steel in humid environments.
- Torque Limits: Avoid over-tightening to prevent stripping threads or damaging concrete.
Step-by-Step Guide to Setting Anchor Bolts
Marking the Anchor Bolt Locations
Accurately marking the anchor bolt locations is crucial for ensuring proper alignment and secure installation of the structure. This step ensures that the anchor bolts align perfectly with the structure you intend to secure, and using a template or guide can help ensure precision. Use a pencil or marker to clearly mark the positions on the concrete surface. Double-check measurements to confirm accuracy.
Drilling Holes
Drilling precise holes is essential for the proper fit and function of the anchor bolts.
- Tools Needed: Hammer drill or rotary hammer drill with the appropriate drill bit size.
- Process:
- Position the drill perpendicular (90 degrees) to the concrete surface.
- Begin drilling with steady, gradual pressure to avoid cracking or damaging the concrete.
- Drill holes just slightly larger than the anchor bolts to ensure a snug fit.
- Periodically remove the drill to clear out dust and debris from the hole to maintain drilling efficiency and accuracy.
Cleaning the Holes
Cleaning the drilled holes is a vital step to ensure a strong bond between the anchor bolt and the concrete.
- Importance: Cleaning removes dust and debris that could weaken the bond and reduce holding strength.
- Method: Use a dust brush, compressed air, or a vacuum to thoroughly clean out the drilled holes. Ensure no debris remains inside the holes before proceeding.
Inserting and Securing the Anchor Bolt
Once the holes are prepared, the anchor bolts can be inserted and secured.
- Preparation: Ensure the threads of the anchor bolts are clean and free of any debris that could affect the installation.
- Insertion: Carefully insert the anchor bolt into the cleaned hole.
- Securing:
- Place a washer against the concrete surface.
- Tighten a nut over the washer until it is snug against the surface. Avoid over-tightening, as this can damage the concrete and reduce the effectiveness of the anchor.
- For precise depth control, thread a nut onto the anchor bolt before setting it into the hole, using the nut as a depth indicator.
Final Adjustments and Tightening
After securing the anchor bolts, make any necessary adjustments to ensure proper alignment and stability.
- Tightening: Ensure the anchor bolts are snug but not excessively tight. Over-tightening can strip threads or damage the anchor and concrete.
- Final Check: Verify that all anchor bolts are evenly spaced and securely fastened. This step helps distribute the load effectively and ensures the stability and safety of the structure.
Handling Tension and Shear Forces
Introduction to Tension and Shear Forces
Anchor bolts are critical in securing structures to foundations, and understanding the forces acting on these bolts is essential for ensuring structural integrity. Two primary forces that affect anchor bolts are tension and shear forces.
Understanding Shear Forces
Definition of Shear Forces
Shear forces cause a material to slide or deform along a plane parallel to the direction of the force. In anchor bolts, shear forces can lead to deformation or failure if not properly managed.
Impact on Anchor Bolts
Several factors affect how anchor bolts perform under shear forces:
- Material Properties: The strength and ductility of the bolt material influence its ability to withstand shear forces.
- Concrete Quality: The type and strength of the concrete in which the bolt is embedded affect its resistance to shear.
- Embedment Depth: Deeper embedment increases the bolt’s shear capacity by distributing the force over a larger area.
Understanding Tension Forces
Definition of Tension Forces
Tension forces act to stretch or elongate a material. For anchor bolts, tension forces can pull the bolt out of the concrete if not properly designed and installed.
Impact on Anchor Bolts
Factors affecting the performance of anchor bolts under tension include:
- Bolt Material: High tensile strength materials are better suited to handle tension forces.
- Anchor Design: Proper design ensures that the bolt can transfer tensile loads effectively to the concrete.
- Embedment Depth: As with shear forces, deeper embedment helps in resisting tension forces by providing more surface area for load transfer.
Design Considerations for Shear Forces
Calculating Shear Capacity
To ensure anchor bolts can handle shear loads, engineers calculate the shear capacity using formulas that consider:
- Yield Stress: The stress level where the material starts to deform.
- Cross-Sectional Area: The effective area of the bolt that resists shear forces.
- Section Modulus: A measure of the bolt’s resistance to bending and shear.
Managing Eccentric Loads
When loads are applied off-center, they create moments that increase both tension and shear forces. Proper design must account for these eccentric loads to prevent bolt failure.
Installation Steps for Effective Shear Resistance
- Select Appropriate Bolts and Ensure Proper Embedment: Choose bolts with high yield strength and appropriate dimensions for the expected shear forces, and embed them at the correct depth to maximize shear resistance.
- Align and Space Bolts Correctly: Proper alignment and spacing help distribute shear loads evenly, reducing the risk of failure.
- Use High-Quality Concrete: Ensure the concrete has adequate compressive strength to support the bolts under shear loads.
- Conduct Testing: Perform pull-out and shear tests to verify the bolts can handle the designed loads.
Managing Tension Forces in Conjunction with Shear
Tension-Shear Interaction
Anchor bolts often face combined loads (both tension and shear forces acting simultaneously), which can reduce their overall capacity. Designers must consider this interaction to ensure the bolts do not fail prematurely.
Design for Combined Loads
To handle combined loads, use design methods that account for both tension and shear. This may involve:
- Using Bolts with Higher Tensile Strength: Bolts with higher tensile strength can better resist combined loads.
- Adjusting Embedment Depth: Deeper embedment can help accommodate the increased forces from combined loads.
Practical Tips for Handling Tension and Shear Forces
- Adherence to Standards: Follow relevant standards and guidelines to ensure the bolts are designed and installed correctly.
- Regular Inspections: Regularly inspect anchor bolts for signs of wear, corrosion, or damage.
- Proper Maintenance: Ensure bolts are maintained according to manufacturer guidelines to preserve their load-bearing capacity.
Load Capacity and Safety Standards
Adhering to load capacity and safety standards is crucial when setting anchor bolts to ensure buildings are structurally sound and safe. These standards prevent failures and ensure anchor bolts can handle expected loads throughout their service life.
According to OSHA regulations, every column must be anchored with a minimum of four anchor rods (anchor bolts). Proper anchorage is vital for maintaining stability and resisting lateral loads during construction and use, ensuring worker safety and preventing accidents.
ASTM F1554 defines three grades of anchor bolts based on their yield strength: Grade 36 (36 KSI), Grade 55 (55 KSI), and Grade 105 (105 KSI). These grades ensure bolts can handle different load conditions.
A safety factor is applied to ensure anchor bolts can withstand loads beyond their recommended capacity. Depending on the application, higher safety factors may be necessary, such as in life-safety or overhead installations.
Setting Anchor Bolts: Step-by-Step Guide
- Preparation:
- Verify concrete strength.
- Select appropriate bolt grade.
- Drilling:
- Use correct drill bit.
- Drill to proper depth.
- Installation:
- Insert bolt.
- Tighten according to specifications.
- Inspection:
- Check bolt tightness.
- Inspect for damage.
- Final Check:
- Confirm compliance with standards.
- Consult professionals if needed.
Common Mistakes and How to Avoid Them
Improper Bolt Positioning
Improper positioning of anchor bolts is a frequent issue that can arise from inaccurate measurements or rushed marking, leading to misaligned bolts that jeopardize structural integrity.
How to Avoid Improper Bolt Positioning
- Utilize Templates or Jigs: Use templates or jigs for precise marking and always double-check measurements with a laser level or plumb line to ensure alignment.
- Cross-Adjustment Techniques: For installations involving multiple bolts, adjust bolts relative to each other to achieve the desired alignment.
Inadequate Hole Preparation
Inadequate hole preparation is another common mistake. Holes that are too shallow, narrow, or uneven can significantly reduce the load-bearing capacity of the anchor bolts, causing them to loosen over time.
How to Avoid Inadequate Hole Preparation
- Always Drill Holes Straight Down: Maintain uniformity by drilling holes straight down.
- Use Correct Diameter and Depth: Follow the manufacturer’s specifications for the correct diameter and depth of the holes to ensure a snug fit.
- Remove Debris Thoroughly: After drilling, use a dust brush, compressed air, or a vacuum to remove all debris from the holes to prevent any loose material from compromising the bond.
Elevation Deviation
Elevation deviation occurs when bolts are set too low or too high, resulting in insufficient thread exposure or unstable equipment mounting, affecting overall stability and load distribution.
How to Avoid Elevation Deviation
- Set Initial Elevation Using a Horizontal Benchmark: Adjust all bolts to the same height with a spirit level.
- Cross-Adjustment: Ensure all bolts are set at the correct elevation by adjusting them in relation to each other.
Incorrect Bolt Tightening
Incorrect bolt tightening, whether over-tightening or under-tightening, can lead to various issues. Over-tightening can damage the bolts or the substrate, while under-tightening reduces the clamping force, leading to potential failure.
How to Avoid Incorrect Bolt Tightening
- Follow Torque Specifications: Adhere to the manufacturer’s torque specifications rigorously.
- Use Calibrated Torque Wrenches: Employ calibrated torque wrenches to apply the correct torque.
- Stage Tightening: Apply torque in stages, alternating between bolts to distribute the stress evenly.
Neglecting Environmental Factors
Neglecting environmental factors such as grout thickness, equipment dimensions, and thermal expansion can cause long-term misalignment and affect the performance of anchor bolts.
How to Avoid Neglecting Environmental Factors
- Consider Grout Thickness, Equipment Dimensions, and Environmental Conditions: Account for these factors during planning to prevent long-term misalignment.
Environmental Factors Affecting Anchor Performance
Moisture and Water Exposure
Exposure to moisture and water can significantly affect how well anchor bolts perform and how long they last. Environments with high humidity, frequent rain, or direct water contact, such as basements or coastal areas, can accelerate corrosion, especially in non-resistant materials like carbon steel.
Mitigation Strategies
- Material Selection and Protective Coatings: Opt for corrosion-resistant materials like stainless steel (A4/AISI 316) or hot-dip galvanized anchors, and apply protective coatings such as epoxy-polyurethane hybrids or ceramic coatings for added defense against moisture.
- Installation Checks: Avoid installing anchor bolts in areas prone to standing water or frequent splashing, such as near drainage systems. Ensure proper drainage and water management around the installation site.
Chemical Exposure
Chemical exposure, especially in industrial or coastal environments, can degrade the adhesion and integrity of anchor bolts. Chemicals like chlorides and sulfates can speed up corrosion and weaken the metal.
Mitigation Strategies
- Chemical-Resistant Anchors: Use epoxy-based adhesive anchors that are specifically designed to withstand harsh chemicals.
- Sealants: Apply waterproof grouts or gels around the anchor bolts to block chemical infiltration, creating a protective barrier that prevents corrosive substances from reaching the metal.
Temperature Extremes
Extreme temperatures, including freeze-thaw cycles and high heat, can affect the performance of anchor bolts by weakening adhesive bonds and causing metal fatigue.
Mitigation Strategies
- Adhesive Anchors: Select adhesive anchors that are rated for the specific temperature range of the project, ensuring durability in various climates.
- Thermal Expansion: Ensure compatibility of mechanical anchors with substrate materials to prevent cracking during temperature shifts, maintaining the structural integrity of the installation.
Seismic and Dynamic Loads
Seismic activity and dynamic loads from machinery can loosen mechanical anchors over time, leading to potential failure.
Mitigation Strategies
- Undercut Anchors: These anchors provide better resistance to dynamic loads compared to traditional expansion anchors. Their design ensures a secure fit even under vibrations.
- Redundancy: Install multiple anchors in critical load-bearing zones to distribute stress evenly, enhancing overall stability and reducing the risk of anchor failure during seismic events or heavy machinery operation.
Step-by-Step Anchor Bolt Installation Incorporating Environmental Factors
1. Site Assessment
- Environmental Audit: Conduct tests to measure moisture levels, salinity, and the presence of chemical residues at the installation site. This information will guide the selection of appropriate materials and coatings.
- Load Calculations: Include both static loads (weight) and dynamic loads (wind, seismic activity) in your calculations to ensure the selected anchors can handle all anticipated forces.
2. Anchor Selection
- Mechanical vs. Adhesive: Choose epoxy anchors for environments with high corrosion potential and expansion anchors for dry, stable substrates.
- Compliance: Verify that the selected anchors meet relevant standards such as ISO 16228 or ASTM F2329 for environmental resilience.
3. Pre-Installation Preparation
- Surface Treatment: Clean the holes thoroughly with compressed air to remove debris and moisture, ensuring a strong bond for the anchors.
- Corrosion Inhibitors: Apply zinc-rich primers in high-humidity zones to provide additional protection against rust.
4. Installation
- Adhesive Anchors: Mix the epoxy resin thoroughly to ensure uniform curing, especially in cold conditions. Follow the manufacturer’s instructions for proper application.
- Mechanical Anchors: Avoid over-torquing during installation to prevent microcracks in brittle substrates, which could compromise the anchor’s holding capacity.
5. Post-Installation Checks
- Curing Time: Allow sufficient curing time for adhesive anchors, typically 24–72 hours, depending on ambient temperature. This ensures the adhesive achieves its full strength.
- Non-Destructive Testing: Perform torque checks or use ultrasonic testing methods to detect early signs of corrosion or bond failure, ensuring long-term reliability.
Recent Advancements (2023–2024)
- Self-Healing Coatings: New coatings that automatically repair surface scratches using microcapsule technology are ideal for abrasive environments, such as seabeds.
- Modular Designs: Interchangeable components allow for customization based on varying salinity or temperature conditions, enhancing adaptability.
- Hybrid Adhesives: Advanced formulations can resist simultaneous exposure to UV light, saltwater, and freeze-thaw cycles, providing superior performance in challenging conditions.
Common Pitfalls
- Ignoring Manufacturer Guidelines: Always adhere to the specified temperature and chemical limits for adhesives to prevent premature failure.
- Inadequate Hole Sizing: Improperly drilled holes can reduce the load capacity of anchors by up to 30%, especially in corrosive environments. Ensure holes are drilled to the correct size and depth to maintain optimal performance.
Cost-Benefit Analysis of Different Anchor Types
Introduction
Choosing the right anchor bolts for construction and engineering projects requires a thorough cost-benefit analysis. This involves evaluating various factors such as initial cost, installation complexity, durability, and suitability for specific applications. Below, we will examine different types of anchor bolts, their costs, benefits, and drawbacks to help you make an informed decision.
Types of Anchor Bolts
Expansion Anchors
Expansion anchors are a common choice for securing objects in concrete and other materials.
- Costs: Generally have a lower initial cost compared to other types.
- Benefits: Easy to install and suitable for a variety of materials, including concrete and brick. They expand upon tightening, providing a secure fit.
- Drawbacks: Over time, their holding power may decrease due to expansion and contraction cycles. They are also not ideal for use in environments subject to significant vibration or dynamic loads.
Sleeve Anchors
Sleeve anchors offer versatility and moderate cost, making them suitable for many applications.
- Costs: Moderate.
- Benefits: Versatile and suitable for use in concrete, brick, and stone. They provide a secure hold and are relatively easy to install.
- Drawbacks: Installation needs a setting tool, which can increase costs. Additionally, they may not perform as well in environments with high vibration or heavy dynamic loads.
Wedge Anchors
Wedge anchors are known for their strong holding power in solid concrete.
- Costs: Higher compared to expansion anchors.
- Benefits: Provide a very secure hold in solid concrete and are resistant to vibrations, making them perfect for heavy-duty applications.
- Drawbacks: Installation requires a setting tool, and they are not suitable for use in hollow or soft materials. The higher cost may also be a consideration for budget-conscious projects.
Steel Anchor Rods
Steel anchor rods are designed for high strength and durability, typically used in structural applications.
- Costs: Higher due to the quality of the material.
- Benefits: Offer high strength and durability, making them ideal for structural applications where long-term reliability is crucial.
- Drawbacks: Need specialized installation skills, which can raise labor costs. They are also more expensive upfront compared to other types of anchors.
Cost-Benefit Analysis Considerations
Installation Complexity
The complexity of installation can significantly impact the overall cost and feasibility of using different types of anchor bolts. For instance, sleeve and wedge anchors require additional tools and more skilled labor, which can increase installation costs. In contrast, expansion anchors are generally easier and quicker to install, potentially reducing labor costs.
Material Durability
The durability of the anchor material is a critical factor in the cost-benefit analysis. Steel anchor rods, while more expensive, offer superior durability and strength, making them suitable for structural applications where reliability is paramount. On the other hand, expansion anchors, while less costly, may not provide the same level of long-term performance, especially in environments subject to frequent expansion and contraction.
Application Suitability
The specific requirements of the project, such as the type of material and the expected loads, play a significant role in determining the most suitable anchor type. Expansion anchors are versatile and can be used in various materials, but they may not be as secure as wedge anchors in solid concrete. Therefore, it is important to match the anchor type to the specific application to ensure optimal performance and cost-effectiveness.
Pricing Strategies and Anchoring
While physical pricing strategies are not directly applicable to the setting of anchor bolts, understanding the perceived value of different anchor types can influence purchasing decisions. For example, presenting a higher initial price for premium anchor bolts can make standard versions seem more affordable by comparison. This psychological pricing strategy can be useful in marketing to highlight the benefits of higher-priced, higher-quality anchors.
Selecting the right type of anchor bolt involves balancing costs with performance and durability needs. By conducting a thorough cost-benefit analysis, you can choose the most appropriate anchor for your project, ensuring both cost-effectiveness and structural integrity.
Frequently Asked Questions
Below are answers to some frequently asked questions:
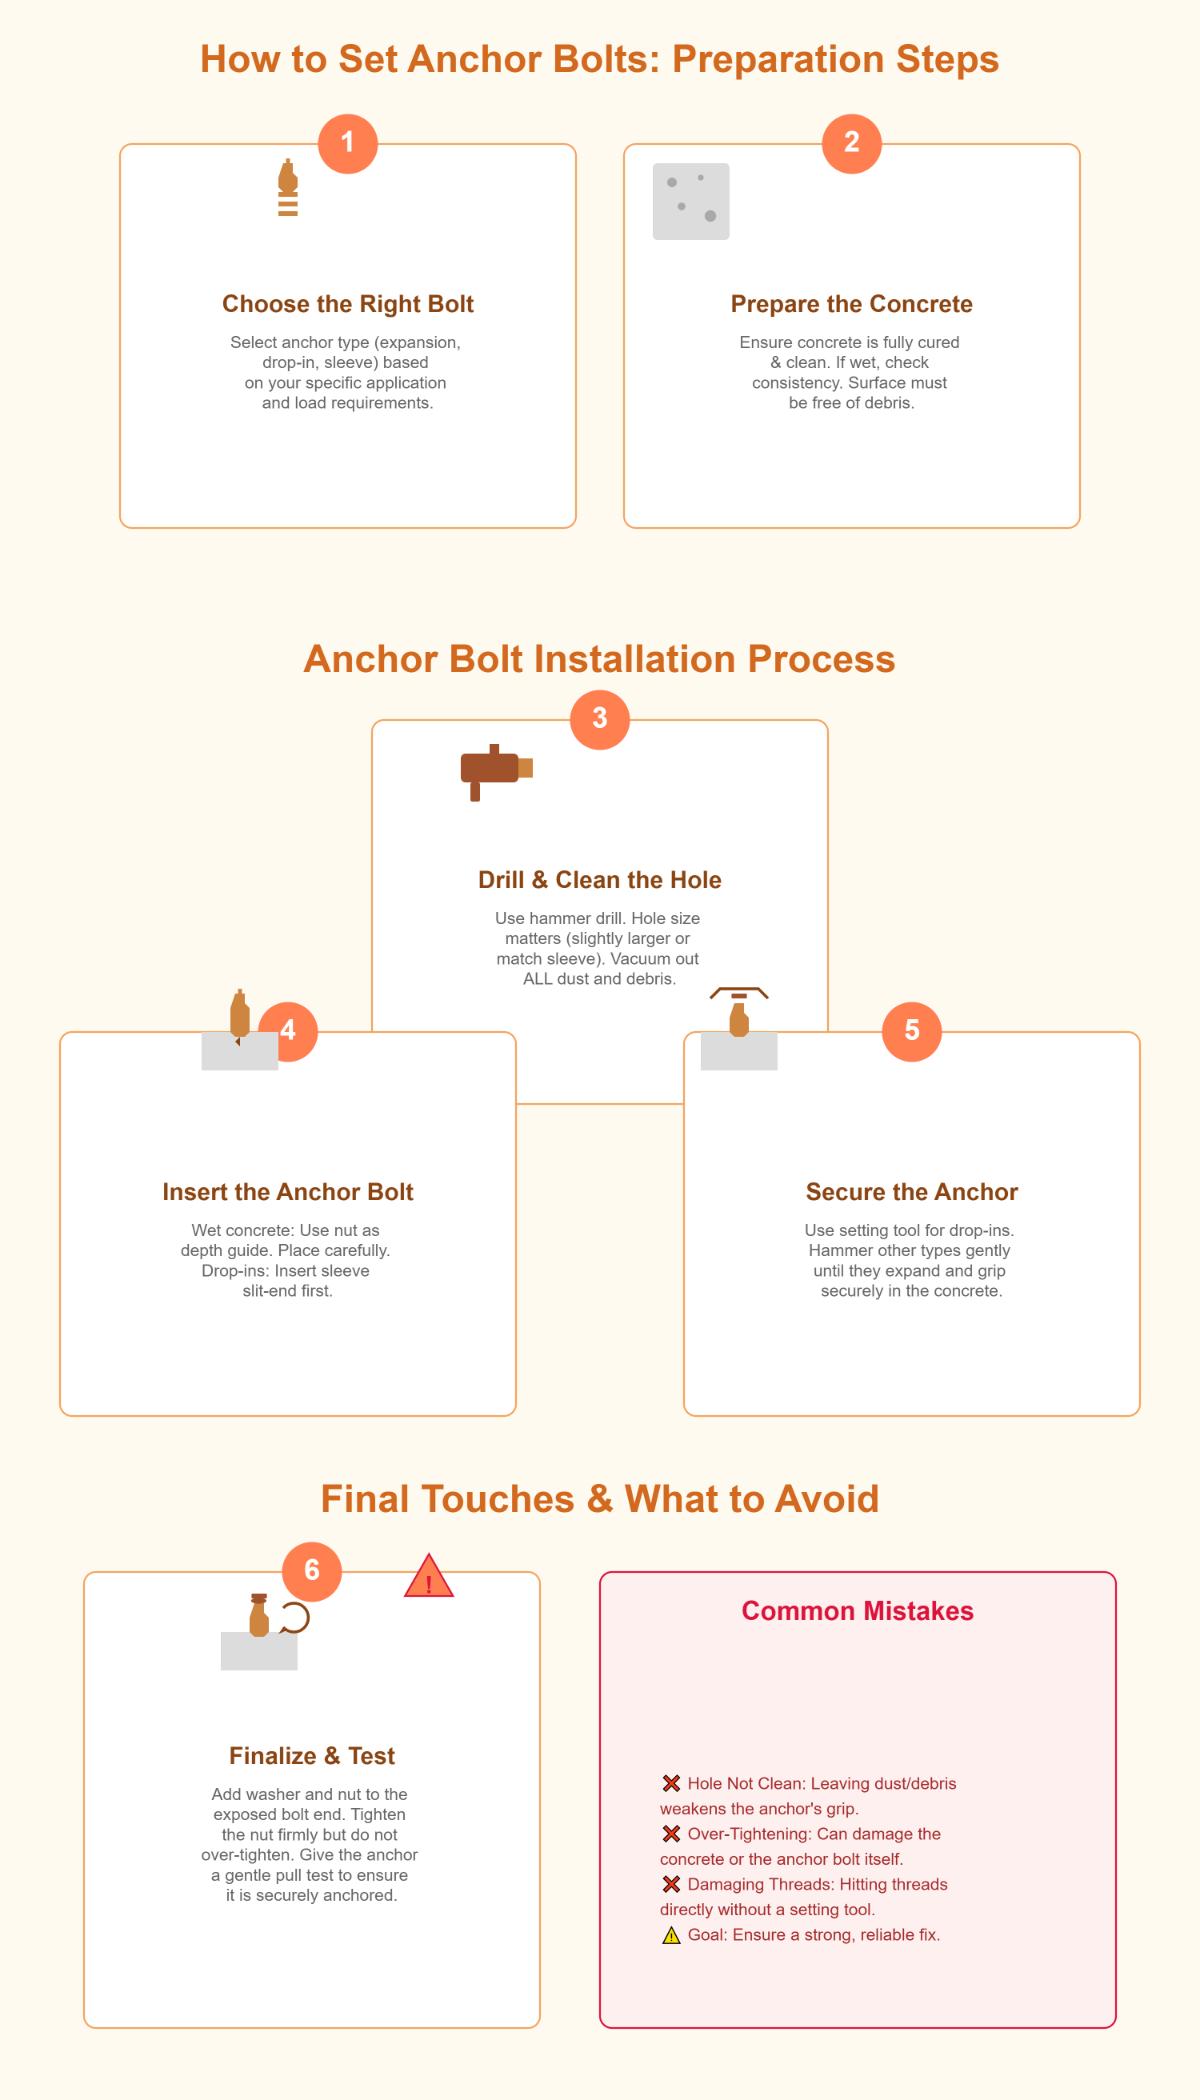
What is the proper method for setting anchor bolts in concrete?
To set anchor bolts in concrete properly, follow these steps:
- Choose the Right Anchor Bolt: Select an appropriate type based on your application, such as expansion anchors, drop-in anchors, or sleeve anchors.
- Prepare the Concrete: Ensure the concrete is fully cured and free from debris. For wet concrete, ensure it has the correct consistency.
- Drill the Hole: Use a hammer drill to create a hole slightly larger than the anchor bolt. For drop-in anchors, the hole should match the sleeve size. Clear any dust and debris from the hole using a vacuum.
- Insert the Anchor Bolt: If setting in wet concrete, thread a nut onto the bolt to act as a depth indicator. Carefully place the anchor bolt into the hole. For drop-in anchors, insert the sleeve slit-end first.
- Secure the Anchor: Use a setting tool for drop-in anchors or hammer the top of other anchor bolts until they expand and secure into the concrete.
- Finalizing the Installation: Add a washer and nut to the exposed end of the bolt and tighten the nut firmly. Test the anchor by applying a gentle pull to ensure it is securely anchored.
Avoid common mistakes such as not clearing debris from the hole, over-tightening, and directly hitting the bolt threads without a setting tool. By adhering to these steps, you can ensure a strong and reliable connection between the anchor bolt and the concrete.
What are the differences between cast-in-place and expansion anchor bolts?
Cast-in-place anchor bolts and expansion anchor bolts are both used to secure fixtures to concrete, but they differ significantly in their installation methods and applications. Cast-in-place anchor bolts are set into wet concrete before it hardens, forming a strong, integral bond with the concrete. This method provides high load-bearing capacity, making it ideal for heavy-duty applications like securing structural elements in high-rise buildings. However, the installation process requires careful planning and timing, as the bolts must be placed before the concrete sets. Additionally, removing these bolts can be challenging and may damage the surrounding material.
In contrast, expansion anchor bolts are installed into predrilled holes in hardened concrete or masonry. When the nut is tightened, the bolt expands, creating a frictional hold within the hole. This type of anchor bolt is easier to install and adjust, making it suitable for lighter to medium loads. Expansion anchor bolts are also generally more cost-effective and easier to remove without causing significant damage to the substrate. However, they offer a lower load capacity compared to cast-in-place bolts and may not perform well in low-density materials.
How do anchor bolts handle tension and shear forces?
Anchor bolts handle tension and shear forces by transferring these loads to the surrounding concrete and the bolt itself. Tension forces, which pull the bolt away from the concrete, are resisted by the tensile strength of the bolt and the concrete’s breakout capacity. A deeper embedment of the bolt into the concrete and wider spacing between bolts can reduce the risk of concrete cone failure under tension.
Shear forces, which act perpendicular to the bolt and attempt to slide it laterally, are managed through the bolt’s shear strength, friction due to bolt preload, and the concrete’s edge resistance. For significant shear loads, additional mechanisms such as shear keys or base plates may be necessary to help distribute the forces and reduce stress on the bolts.
Effective handling of combined tension and shear forces requires careful design and adherence to load interaction equations, which ensure that the combined effect of these forces does not exceed the bolt and concrete capacities. Proper installation practices, including adequate embedment depth, correct bolt spacing, and ensuring proper alignment, are crucial to maintaining structural integrity under these loads.
What materials and tools are needed for anchor bolt installation?
To install anchor bolts effectively, you will need specific materials and tools to ensure a secure and reliable setup.
Materials Needed:
- Anchor Bolts: Choose from carbon steel, stainless steel, or galvanized steel based on strength and corrosion resistance requirements.
- Washers and Nuts: Essential for securing the anchor bolts.
- Drill Bits: Select the appropriate size for creating pilot holes.
- Concrete or Masonry Material: The surface where the anchor bolts will be inserted.
Tools Required:
- Drill: For creating pilot holes in the concrete or masonry.
- Torque Wrench: To tighten nuts securely and evenly.
- Cleaning and Deburring Tools: To ensure the area is free of dirt and debris.
- Level or Plumb Line: To ensure the anchor bolts are installed perpendicularly and aligned correctly.
- Setting Tools: Necessary for specific types of anchors, such as machine screw anchors, to ensure proper installation.
By using these materials and tools, you can effectively set anchor bolts, ensuring they meet the required strength and alignment specifications for your project.
How do I calculate the load capacity for different anchor bolt types?
To calculate the load capacity for different anchor bolt types, several factors must be considered, including bolt material, diameter, length, concrete strength, embedment depth, and type of load (tensile or shear).
For tensile load capacity, use the bolt’s ultimate tensile strength (UTS) or yield strength, along with its cross-sectional area. The formula is:
where ( ϕ ) is a reduction factor, ( fut ) is the ultimate tensile strength, and ( A ) is the bolt area.
For shear load capacity, consider the bolt’s shear strength and the number of shear planes. The formula is:
where ( fy ) is the yield strength.
For pull-out strength, especially for grouted or epoxy-set bolts, use:
where ( F ) is the pull-out force, ( BD ) is bolt diameter, ( L ) is the length embedded, and Bond Strength is typically around 1600 psi for epoxy to steel.
Load capacity charts and tables can provide general guidelines based on bolt size and type, while specific calculations should refer to engineering standards. Ensure proper concrete preparation and correct installation to maintain effective capacity.
What are the safety standards for structural fastening with anchor bolts?
The safety standards for structural fastening with anchor bolts are primarily guided by the ASTM F1554 specification, which outlines requirements for three grades of anchor bolts based on their minimum yield strength: Grade 36 (36 ksi), Grade 55 (55 ksi), and Grade 105 (105 ksi). These standards ensure that anchor bolts meet specific chemical composition, tensile strength, and dimensional requirements, as well as mechanical testing for durability under load.
Installation codes, such as those from the International Residential Code, dictate the spacing, embedment depth, and alignment of anchor bolts. For instance, bolts should be spaced no more than 6 feet apart, with at least one bolt within 12 inches of the plate ends. The embedment depth is determined by the bolt diameter and load requirements to prevent pull-out failure, and bolts must be aligned properly to avoid eccentric loading.
Additional safety considerations include using compatible materials to prevent galvanic corrosion, avoiding over-torquing to prevent concrete fractures, and conducting periodic inspections for signs of corrosion, loosening, or deformation. Compliance with these standards ensures the structural integrity and longevity of anchor bolt installations.