How Arc Welding Works: A Step-by-Step Guide for Beginners
Have you ever wondered how two pieces of metal can be joined together so seamlessly? Arc welding is the answer,…
The common rule for operating in various welding positions is to maintain the correct electrode angle, master the three actions of electrode manipulation, control the surface shape and temperature of the molten pool, ensure complete metallurgical reactions of the molten metal, thoroughly eliminate gases and impurities, and achieve good fusion with the base material.
The temperature of the molten pool is related to its shape and size. By carefully observing its changes during operation and continuously adjusting the angle of the electrode and the movement of the electrode, the temperature of the molten pool can be controlled and the quality of welding can be ensured.
The metal droplets from the electrode mainly rely on gravity to transition to the molten pool, making it easy to maintain the shape of the molten pool and the molten metal. When welding workpieces of the same thickness, the welding current in the flat position is higher than in other positions, resulting in higher welding productivity. Slag and molten metal can easily mix together, especially during fillet weld welding, where slag can get ahead and form slag inclusions.
Incorrect welding parameters and operations can lead to defects such as incomplete penetration, undercut, or weld lumps. During flat plate butt welding, if the welding parameters or sequence are improperly chosen, welding deformation can easily occur. In single-sided welding with double-sided formation, the first weld may result in uneven penetration and poor backside formation.
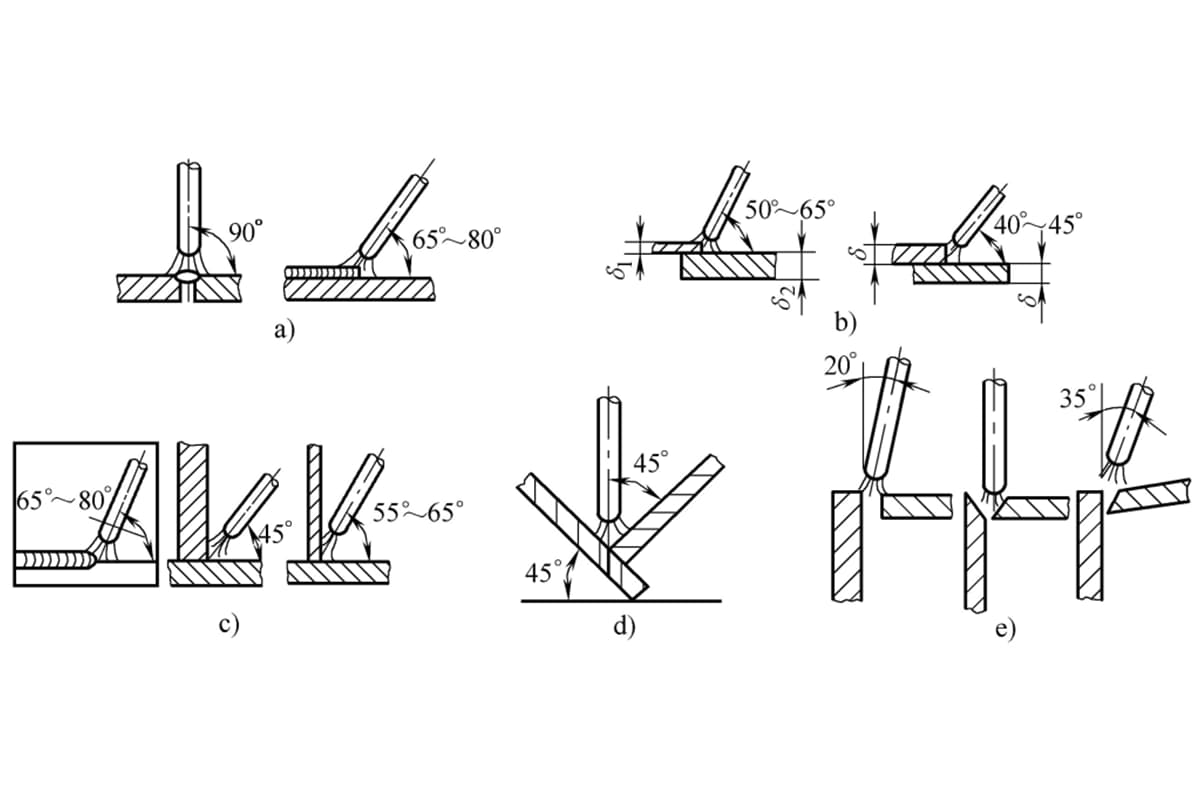
The electrode angle in a flat position can be divided into butt joint flat welding, lap joint fillet welding, T-joint fillet welding, boat welding, and corner joint flat welding. The electrode angle for flat positions is shown in Figure 5-26.
a) Butt joint flat welding
b) Lap joint fillet welding
c) T-joint fillet welding
d) Boat-shaped welding
e) Fillet weld on a corner joint
Place the workpiece in the flat welding position, the welder holds the welding tongs with the welding rod clamped on it, the face is protected by a face shield (helmet-style or hand-held), strike an arc on the workpiece, use the high temperature of the electric arc (6000~8000K) to melt the metal of the welding rod and the base metal, the melted parts of the two metals fuse together to form a molten pool. After the welding rod is moved away, the welding molten pool cools to form a weld seam, which firmly combines the two separated base materials together through the weld seam, achieving welding in the flat position.
For plate thickness <6mm, I-groove butt welding in flat position, using double-sided welding, the front weld should use a straight line electrode manipulation, slightly slower, and the back weld should also use a straight line electrode manipulation, with a welding current slightly higher than that used for the front weld, and faster electrode manipulation.
For plate thickness ≥6mm, according to design requirements, other types of grooves (V-groove, double V-groove, Y-groove, etc.) besides I-groove may be used for butt welding in flat position, using multi-layer welding or multi-layer multi-pass welding. The first layer (root pass) should use a small diameter electrode, low welding current, and straight or zigzag electrode manipulation. For subsequent layers, larger diameter electrodes and higher welding currents with short arc welding can be used. Zigzag electrode manipulation must pause on both sides of the groove, and the welding direction of adjacent layers should be opposite, with staggered joints.
For T-joint fillet welds with a leg size <6mm, single-layer welding can be used, using straight, oblique circular, or zigzag electrode manipulation methods; for larger leg sizes, multi-layer welding or multi-layer multi-pass welding should be used. Root pass should use straight electrode manipulation, and subsequent layers can use oblique zigzag or oblique circular electrode manipulation. Multi-layer multi-pass welding should preferably use straight electrode manipulation.
For lap joint and corner joint fillet welds, the electrode manipulation is similar to that of T-joint fillet welds.
The electrode manipulation for boat-shaped welding is similar to that for open groove butt welding in flat position.
In vertical welding, the molten metal and slag tend to separate due to gravity. When the pool temperature is too high, the molten metal tends to flow downwards, forming defects such as weld beads, undercut, and slag inclusion, making the weld seam uneven. The root of the T-joint weld is prone to incomplete penetration. The depth of penetration is easy to control, consumes more electrodes than flat welding, yet the productivity is lower than flat welding. Due to the heat of the vertical angle welding arc being transferred in three directions to the workpiece, cooling is rapid. Therefore, under the same conditions as vertical butt welding, the welding current can be slightly higher to ensure good fusion of the two plates.
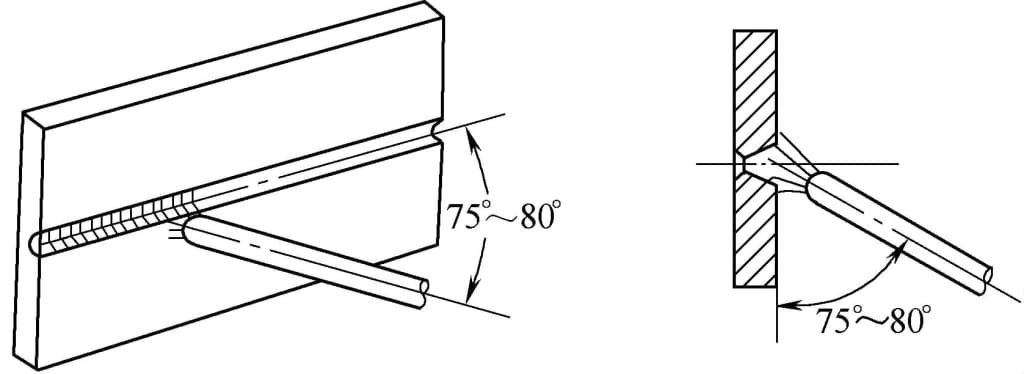
Vertical welding is divided into thin plate butt vertical welding and thick plate butt vertical welding according to the thickness of the workpiece; it can be divided into I-shaped groove butt vertical welding and T-shaped joint vertical angle welding according to the form of the joint; it can be divided into upward vertical welding and downward vertical welding according to the welding operation method. The electrode angle in the vertical welding position is shown in Figure 5-27.
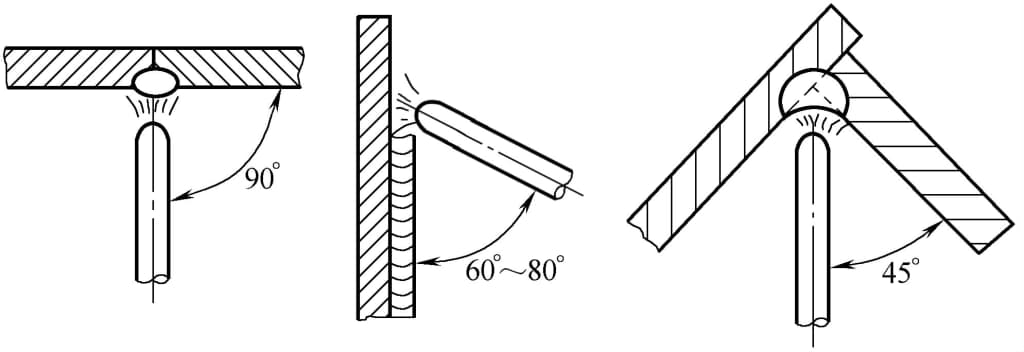
In vertical welding, after the electrode is clamped by the welding tongs, the welding tongs and the electrode should be in a straight line, as shown in Figure 5-28. The welder’s body should not face the weld directly, but should be slightly to the left or right (for left-handers), to facilitate the operation of the right hand (for left-handers) holding the welding tongs.

Commonly used in production is upward vertical welding; downward vertical welding requires special electrodes to ensure weld quality. When welding vertically upwards, the welding current should be 10% to 15% smaller than during flat welding, and a smaller electrode diameter (<4mm) should be used, maintaining the correct electrode angle. Short arc welding is used to shorten the distance of droplet transition to the molten pool.
1) When welding a thin plate I-groove butt joint in a vertical upward position, the commonly used maximum arc length should be ≤6mm. Linear, serrated, crescent-shaped weaving or skip welding can be used.
2) For other types of groove butt vertical welding, the first layer of weld is often done using skip welding or crescent-shaped, triangular weaving with small amplitude, followed by crescent-shaped or serrated weaving methods.
3) When vertical welding a T-joint, the electrode should have appropriate dwell time on both sides and the top corner of the weld, and the electrode swing should not be greater than the width of the weld. The weaving operation is similar to that used for other types of groove butt welding.
4) When welding the cover layer, the weaving method should be chosen based on the requirements for the weld surface. For slightly higher surface requirements, crescent-shaped weaving can be used, and for a flat weld surface, serrated weaving is suitable.
Due to gravity, molten metal tends to fall to the groove, causing undercut defects on the upper side of the groove and forming a teardrop-shaped weld as shown in figure 5-29b. Molten metal and slag are easy to separate.
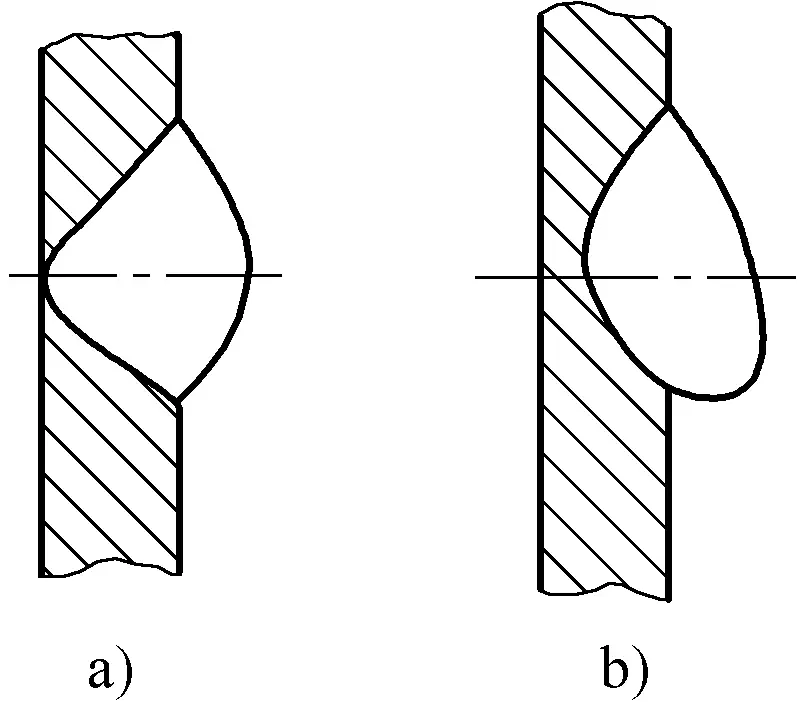
a) Normal horizontal weld b) Teardrop-shaped horizontal weld
When welding horizontally, it is best for the welder to operate while standing. If possible, the hand or arm holding the face shield is the best support to keep the body stable during standing welding, and the arc striking point should be directly in front of the welder.
During welding, after finishing each electrode, the welder needs to move their standing position to always face the weld directly. The upper part of the welder’s body should move forward with the arc, but the eyes still need to maintain a certain distance from the welding arc. Also, pay attention to maintaining the angle between the electrode and the workpiece to prevent excessive dripping of molten metal. The electrode angle for horizontal welding is shown in Figure 5-30.
1) For butt horizontal welding, generally use a V-shaped or K-shaped groove, and for butt joints with a thickness of 3~4mm, an I-shaped groove can be used for double-sided welding.
2) Use a small diameter electrode, the welding current should be smaller than that used in flat welding: short arc operation can better control the flow of molten metal.
3) For thick plate horizontal welding, besides the root pass, it is advisable to use a multi-layer and multi-pass welding method.
4) When performing multi-layer and multi-pass welding, pay special attention to the overlap distance between passes. Each overlapping weld should start at 1/3 of the previous weld to prevent unevenness in the weld.
5) Depending on the specific situation, maintain an appropriate electrode angle, the welding speed should be slightly faster and even.
1) When performing horizontal welding with an open I-groove, it is better to use a reciprocating straight line weaving method for the front weld, slightly thicker pieces should use a straight line or small oblique circular weaving, and the back weld should use a straight line weaving. The welding current can be appropriately increased.
2) For multi-layer horizontal welding with other types of grooves, when the gap is small, a straight line weaving can be used; when the gap is large, use reciprocating straight line weaving for the root pass, and oblique circular weaving for the subsequent layers. For multi-layer and multi-pass welding, straight line weaving is advisable.
Due to gravity, molten metal tends to fall, making it difficult to control the shape and size of the weld pool. Weaving is challenging, and it is difficult to achieve a smooth surface on the weldment. Defects such as slag inclusion, incomplete fusion, concave weld beads, and poor weld formation are common. Flowing molten metal is prone to splatter and spread, which can cause burns if not properly protected, making overhead welding less efficient than other spatial positions.
Depending on the distance from the welder to the workpiece, the welder can adopt standing, squatting, or sitting positions, and in some cases, even a lying position, where the welder lies on the ground face up, holding the welding clamp overhead. Overhead welding is physically demanding and the welding quality is unstable, typically used for emergency repairs and not suitable for mass production in manufacturing.
During welding, the welder’s arms should be away from the body, the forearm erected, and the upper arm naturally forms an angle for support, with the center of gravity on the elbow or the joint at the base of the upper arm. The movement of the electrode should be accomplished by the wrist, and as the electrode melts, the upper arm should gradually rise and move forward. The eyes should follow the movement of the arc to observe the welding process, and the head and upper body should also tilt slightly forward as the electrode moves.
Before overhead welding, the welder must wear the necessary protective clothing for overhead welding, fasten the buttons, wrap a towel around the neck, wear a shoulder cap, and wear heat-resistant shoes to prevent molten iron from falling and splashing metal from burning the skin. The welder holds the welding clamp and adjusts the angle of the electrode according to the specific situation, and can also flip the part to be welded to a flat or horizontal welding position. The electrode angle for overhead welding is shown in Figure 5-31.
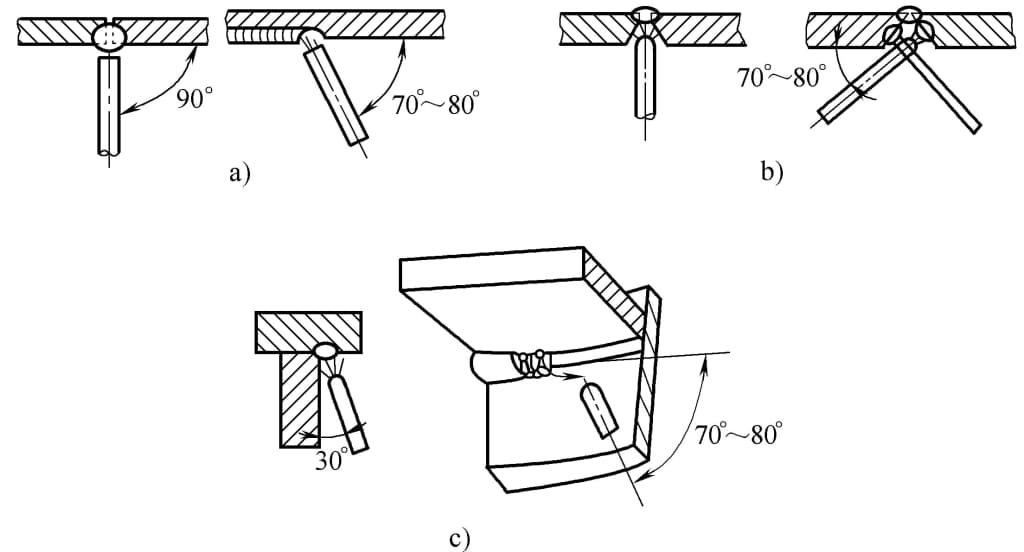
a) I-groove butt overhead welding b) Other groove butt overhead welding c) T-joint overhead angle welding
1) When the thickness of the workpiece is ≤4mm, I-groove butt overhead welding is used with a 3.2mm electrode, and the welding current should be appropriate. For thickness ≥5mm, V-groove multi-layer multi-pass welding is used.
2) When the weld toe <8mm, T-joint weld overhead welding should use single-layer welding; when the weld toe >8mm, use multi-layer multi-pass welding.
3) To facilitate droplet transition, reduce metal dripping and spatter during welding, the shortest arc length should be used during the welding process.
4) For the root pass welding, use a small diameter electrode and low welding current to avoid undercut and slag inclusion on both sides of the weld.
1) For small gaps, use straight electrode manipulation for I-groove butt overhead welding; for larger gaps, use straight back-and-forth electrode manipulation.
2) For multi-layer overhead welding with other types of groove butt joints, the electrode manipulation method for the root pass should be chosen based on the size of the groove gap, using either straight or back-and-forth straight electrode manipulation. Subsequent layers can use zigzag or crescent electrode manipulation. Multi-layer multi-pass welding should use straight electrode manipulation, and regardless of the method, each transition of molten metal to the weld pool should not be excessive.
3) For T-joint overhead welding, if the weld toe size is small, straight or back-and-forth straight electrode manipulation can be used, completed by single-layer welding; if the weld toe size is larger, multi-layer or multi-layer multi-pass welding can be used, with the first layer using straight electrode manipulation, and subsequent layers can use diagonal triangle or diagonal ring electrode manipulation.